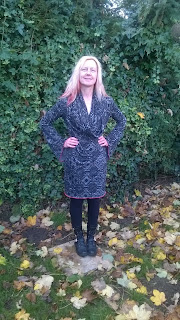
This is the new version:
This is my original dress which I had so many problems with:
I am assuming my reader already knows how to trace a burda pattern. If not there are already lots of tutorials out there telling you the way to do this.
Try here:
http://so-sew-easy.com/tracing-burda-patterns/
and here:
http://www.afashionablestitch.com/2013/shop_talk/how-to-trace-sewing-patterns/
and here:
http://www.fehrtrade.com/article/99/how-to-trace-a-pattern
and I am sure there are lots more out there.
So I have my pattern traced. Its been pinned to my fabric and the pieces are all cut out.

For this version of my dress I have decided to try not to get too confused with the magazine directions so I am doing this my own way. To make life easier still, I have done the second version of this pattern and used a contrast for the hood facing which I suspect will make the construction somewhat easier.
Anyway here goes.
1) attach the hood facing to the hood.
This time I decided to use a different colour for the facing to try and make it easier to see what I am doing.
2) join the back hood seam


3) attach the back dress piece at the shoulders - this is the hard bit. First check fabric is correct side so as to not sew it on inside out.This is the part of this pattern I find the trickiest to achieve. Maybe I just did not trace the pattern pieces correctly or maybe they are just drawn slightlyout or maybe I stretched my fabric whilst cutting, but still at this second attempt the pieces do not quite fit. Of course it could be due to my having to cut half a pattern piece for my front and then move it along the table to continue cutting! Either way my pieces do not match right. You need to sew along the back neck first. Burda say to sew right accross the back neck and shoulders if I am understanding them right but it just will not work for me so first I sew the back neck and then each shoulder.

The picture below is of the hood joined to the back and you can now see the two shoulders ( without sleeves)


Turned inside out with the black hood facing outside showing where the neck opening is:
4) Insert sleeves. Sorry I forgot to take photos of this.
Make sure you also sew the facing inside with the sleeves where it is shaped to follow the sleeve opening. Ensure the fabric is the same way for the sleeve piece as for the dress body to avoid sewing sleeve on inside out. I have done this lots of times believe me. To do this I measure half way up the sleeve and use a pin to mark.
Then I measure half way up armhole which is not necessarily the shoulder seam but usually slightly off the centre. Then pin sleeve centre to the half way point. Then I pin each end of the sleeve. I am overlocking ( or serging) so then I just go slowly and line up the pieces and I sew. If I need to stretch one bit slightly I do so to get the sleeve to fit inside the armhole. I also use as many pins as needed to attempt to stop the sleeve fabric slipping away from the rest of the dress while sewing. Be careful not to sew over the pins since besides hurting you later when you try it on they tend to break your sewing machine needle.
5) repeat for second sleeve.
6) I now should have a front joined to the back and two sleeves inserted so just need to do the side seams. If you line up the ends of the sleeve and the hem of the dress and check the side seams all meet in the right places you can simply sew from one end to the other which means your sleeve and dress side seam are all sewn up at once.
7) Hem sleeves and bottom edge of the dress and you are finished. Or just leave unfinished if you prefer. I used a twin needle for this dress for the hem and the sleeve hems, but the original version was just overlocked. You can see the original dress ( top of the page) has red contrast overlocked edges which makes the sleeves a bit long. I do not currently want to shorten them though since I may yet decide to hem them since I have found that velcro on my waterproof jackets keeps catching on the overlocking and pulling the stitches.
The next picture shows the cowl with contast lining with the hood down:

I hope this helps someone else because despite Burda saying this is an easy pattern. I definitely have had several problems even when repeating it. Having said that I do love this pattern. If you have made this how do you like it? What changes have you made to improve the pattern?
Thanks for reading
Bracken


No comments:
Post a Comment