Monday 28 January 2019

Fluorescent orange and black leggings

After the success of the diamond leggings made from my cheapo crepe fabric I decided to make more. I had quite a bit of fluorescent orange left over from this jacket.

I was really pleased with this when first I made it. It was a serious achievement for me but when I look at it now I just see what is wrong with it eg. look at that wavy zip!

 Anyway I mixed this with some black which is a lighter weight but definitely does have lycra in it. I used the black before for my Yoga pants and this multi media T shirt top.

Again like my colour blocked diamond leggings there is no elastic in the waistband but this time I was even more sure they would not work due to the lighter weight of the black fabric and nearly gave in and added it.

I did forget to sew in the pocket on these which is a shame. I jumped in and started to sew late at night and did not read the instructions and had already overlocked them - front side to front. The pocket is meant to be sewn into the seams on top of the black parts. So you are meant to sew the side panels before joining the front and back!


Still I have now cut out a second pair of these in cream and black and they have not one but two pockets to make up for it. I will show you them once I have them sewn up. Right now they are sat waiting on my table.


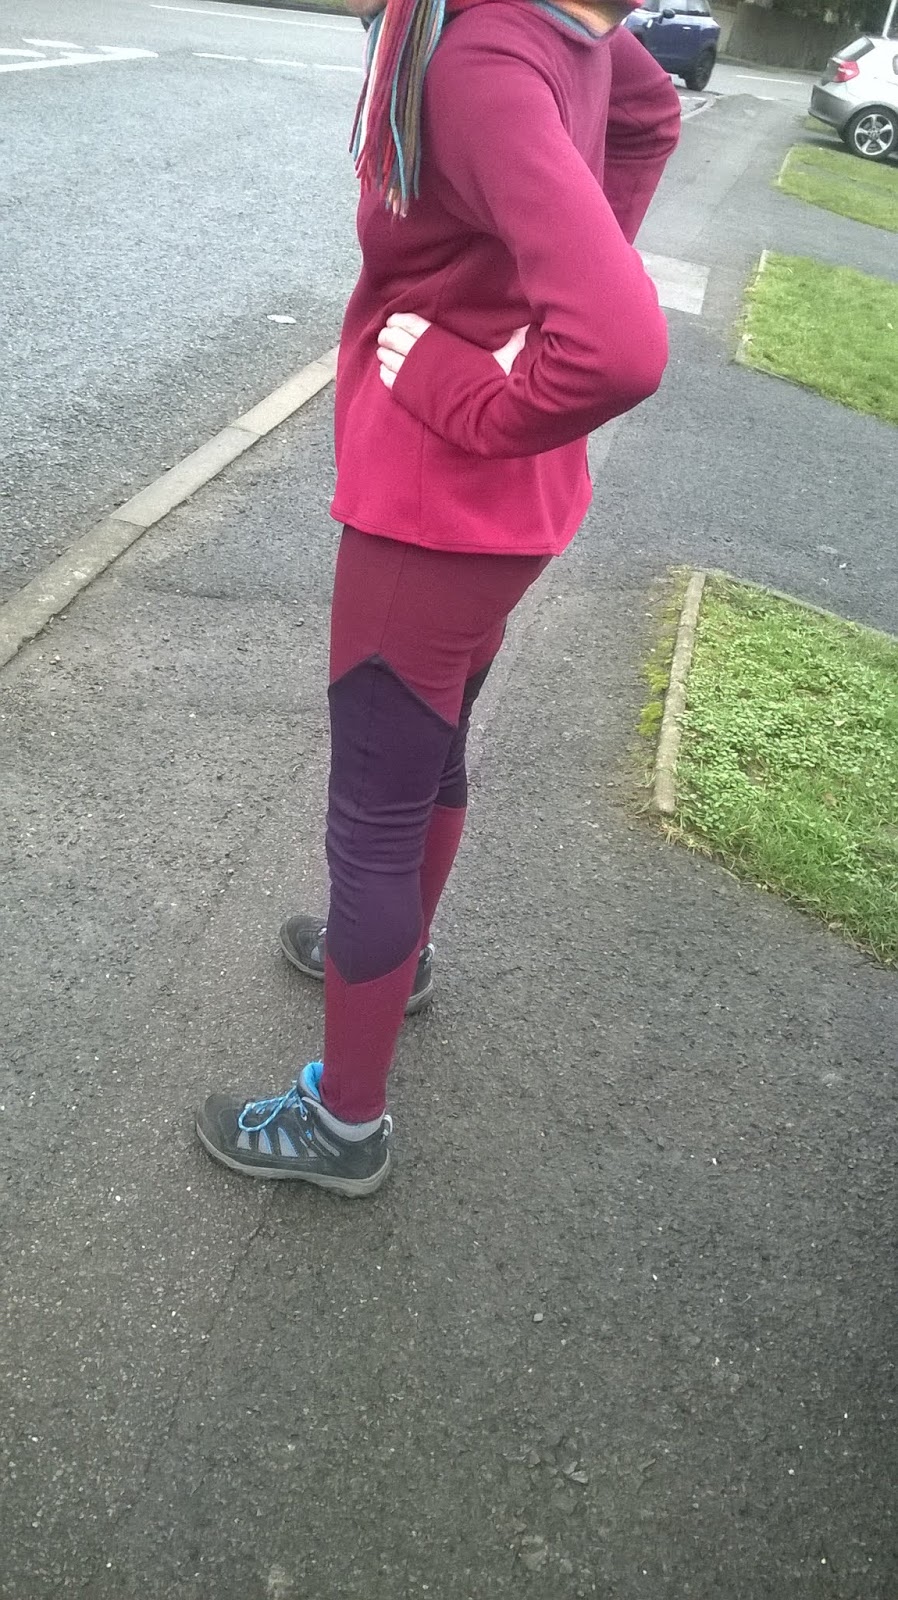
Again these leggings have so far stood up to everyday life perfectly and I love them.

They are very warm and cozy and I think stylish, though my other half did say I look like I am doing some kind of H&S exercise which was a bit off-putting to my brightness and maybe I will not wear my jacket and leggings at the same time!


The orange panels are not perfect as you can see below but they almost line up. They are slightly off set, but as a first pair I am happy enough with these.

One problem I do have with this fabric is it gets dirty so very quickly because fluorescents by their nature are pretty pale even while being bright.


Again imperfectly lined up panels!


So, so far, so good with making leggings. I am starting to feel a bit more confident with the sportswear patterns now.. 
Oh and by the way this is the leggings from pattern McCalls M7446.

Thanks for visiting
Bracken


Pink wheel-barrows for pixies

 
I just have to show you my new wheel barrow. I needed a reasonably priced well made wheel barrow and I wanted a plastic one because they are much lighter than the metal builder's barrows so I went looking and I found this. Well in the local garden centre they had green or lilac but neither were well made and the green was £50 and lilac was £70. This though is from the equine centre and was just £46 so a real bargain. It also has a metal plate to make it stronger on the bottom of the plastic bit which the garden centre ones did not so I think it should last longer. My old metal barrow has just about had it but was bought, I reckon, around 2001 so its very old. Its also very heavy. This is far better. 
They also did this in blue but the pink was just calling to me!

Of course really this post is about my Pixie dress which is the same pattern as this one: 
 You can read about that here:


The blue velvet version was the top rather than the dress. I find it does not work well really. It looks great, fits well but the hoody if not worn up on my head drags the neck back. Its of course due to the velvet pile which is the same direction nap when up but opposite nap when down. Anyway it does not work as well as I had hoped - in comfortable way. I spend the whole time I am wearing it, fiddling with it, which is rubbish really.
I love the point at the back of the skirt!
This time I used a light weight lycra-synthetic exercise fabric so it has slip to stop the hood catching on the neck and body. This dress was meant to be made for summer 2018. I cut it out in February and never got round to sewing it up until this week so its a bit too thin really for the time of year but will give me  a bit of a head start for this years summer wardrobe collection.

The fabric is a pale pink with black and gold but my barrow is so bright it dulls the look of my dress. I never even tried to pattern match since did not have much of this fabric. It does not worry me. I did place the front and back so they will almost match but the hood had to be cut from what was left and similarly the sleeves.

This is Simplicity 1251 which is meant for fleece but works perfectly well in any stretch fabric. This time though I cheated a bit and just overlocked the neck and turned it under and sewed with a twin needle rather than add bias how the pattern says. Its more T-shirt like as a result but works fine and to be perfectly honest about this, this dress has been sat taking up room on my sewing table for a year and I was sick to death of seeing it. Several times I have lost one or more parts of it to my stash and had to find them so its well over due for me to get round to sewing this. The sewing then needed to happen fast between several other projects just so I can get rid of this. As it happens I am very pleased with the final result - even though its unlikely I will wear it till April or May but at least I finally got round to making this. It would have been a waste not to as well because its a nice little summer dress.

And finally here is one more of my lovely bright pink wheel barrow 😁


Thanks for popping by
Bracken

Monday 21 January 2019

Sportswear leggings for January


Well it’s a new year and New Years resolutions etc so I am making sportswear. Its not actually because I made the New Year resolution to get fit though, it is actually because I made the resolution to seriously reduce my stash of fabric. Well to be fair I have been aiming to do this for months but now after making lots of items up at last, rather than just thinking of making them that is!
My not-quite-so-capsule-wardrobe of Autumn led to lots of off-cuts of fabrics left over of large-ish sized bits of useable fabrics. Since my aim is not to add these back to my far too large stash I need to use them up rather than waste all my lovely fabric. I also really really do need some warm track pants. I was thinking originally of my TRN Lekala pattern which I have already made up several times but decided instead why not use this polyester fabric which seems to retain shape very well to make winter leggings?
Partly this is another aim- I seem to also have stashed loads (and I do mean loads) of patterns which at this time remain unused. So,me in fact go back nearly ten years now and still uncut so time to use my patterns and to get rid of my fabric and make useful and wearable clothing that will also ( hopefuly) keep me warm.

 I am not at all sure what the fibre content is of this fabric. I bought loads of it over  time off an Ebay seller and it was quite cheap and sold as “stretch crepe polyester”. I think possibly there may really be some lycra in it because it seems not to go out of shape but maybe not. I do not know. I am not an expert at fabric so this is all guessing and there were no labels etc. I think the right side which is the crepe side is vile. Reminds me of elastic waisted trousers worn by my Grandma in the 80s. You do find things made from this fabric even in trendy high street shops such as River Island but personally I see it as “old lady” fabric.

A while back now I decided to use the wrong side to make a jacket and while the jacket is not perfect ( wavy zip!).

You can read about this jacket here:https://brackencrafts.blogspot.com/2017/04/98-and-99-sports-top-and-flared.html

I do wear this with enjoyment and I reckon its definitely the way to go with this crepe stuff. I actually read recently that this is currently called Ponte de Roma. Well whatever it is I only like the back of the fabric and then only because I already own this and cannot afford to just throw it away. Since tmaking my jacket I have done the same thing and made the majority of the Winter Capsule Wardrobe by reversing the same type of fabric and that also was successful so again this time I am making leggings with the wrong side. The other impprtant thing about this stuff is its warm. Far warmer than exercise fabric.

Perfect I think for winter leggings - but a few experiments will prove this one way or the other.
So for my first experimental pair I used this pattern:

Image result for MCcalls leggingsI have already used this pattern and made the top up which is worn with these leggings and you can read about that here:
This time though for leggings:


 I am quite pleased and they nearly lined up perfectly at all the joins. Hopefully the next pair will be perfect.

I even dug out my ancient (90s) fluffy ski jacket ad they go with that too. The original idea was to clear out someof my old clothing so anything I cannot currently wear. The idea was if I have not worn it for a year then try on, assess and then get rid. In the case of my fluffy pink jacket though it has to be a keep. I suddenly have something I can handle wearing with it.


And yes they seem to work well. Also stood up to being raked by dog claws and no pulls on them which is excellent. They are definetly warmer than regular exercise wear and still useable for running - if I was to get that inspired to try. So far they have stood up perfectly to every day life so I am intending to make a few more pairs of these as well.

The other interesting thing about these leggings ( other than fabric choice that is) is they have no elastic in the waistband. I was skeptical at first about this. I decide to give it a go even though the pattern is made for proper lycra type performance / dance wear fabric. They work perfectly with this crepe fabric even with no elastic. I wore them all day – shopping round town. Dog walking, house cleaning etc and they are fine and stayed put without elastic.

Since then in fact I have now worn several times and they still work. Amazing! I would never have believed it and nearly added elastic just to make sure but decided to go with the pattern and see. I will have to see what happened when they get a bit more worn but for now they work really well. And you know what I felt really good in these about town even with my diamonds not being quite perfectly matched!


All in all then a great make from what I am now thinking may be ponte de Roma fabric.


Monday 14 January 2019

Lilac Velvet Coat - Arkivestry for Simplicity 1732

This is my new winter coat made from lilac upholstery grade velvet. Its a dull grey winter day today in Coventry, UK so sorry about photo quality etc.

This was really a HUGE project for me but I am very happy with the final outcome.I actually started this coat last winter, in February I think, and never finished it because it kind of evolved. The pattern is Arkivestry for Simplicity 1732.

The fur collar and cuffs are made from a long faux fur infinity scarf I found for 99p in a charity shop and this is how the whole project began. I have had the pattern for ages but never had the right fabric.

To make the lilac velvet fabric work I had to cut the side panels the opposite way to the centre panels in order to eke it out. I suppose so long as I do not tell then most folk will think the different direction of the nap are intentional details.


Its taken quite a while because I started this in February 2017 and actually spent about 3 weeks virtually constantly stitching ( as in whenever I was not at work I was stitching this up). Then gave up in May and ignored this all summer then the last 3 weeks just to work out how to finish it. Then actually doing the finishing has taken quite a while but now its done.


I had sewed everything up pretty fast really and started to hand sew up the lining hem to the velvet outer. Well as you know I hate hand sewing and when March came in 2017 it was quite warm and I no longer needed this coat. So I found other projects and it sat there waiting which as it turns out was for the best.

The actual construction is pretty easy. I even added braid to decorate the sleeves where the fur and velvet meets to continue the Arrivestry Steam Punk theme. I decided to use my black braid around the sleeves, which I bought for just such a project while not yet knowing what I was going to do with it. I like the effect very much. Its hard to see on the photos but I will take more and add them later to try to show this bit.

Then I made my only mistake with this. I have this lilac faux silk / satin. Possibly it is charmeuse but I am not certain. I bought 6m of it ages ago and was a real bargain, but it will be difficult to wear in every day life though I do see a nice work shirt coming out of it at some future occasion once I find the right pattern.  Its more the sort of fabric people make bridesmaids dresses from then line coats with but it’s the perfect colour and I want this to be a very special coat so have taken a lot of time over this garment.

But what I should have done here was use the satin side in the sleeves and the silk side for the body because I love the luxurious look the silk gives as a lining but the sleeves do not really have enough “slip” so the satin side would have worked better. I even considered taking them out and redoing them but I had already spliced them all around to help them lay flat and was not sure I could achieve this and in the end its not the end of the world and not unliveable so I decided to just live with this and learn for my next coat.


The fact is it still works. It just could have been better. But then sewing is a learning process and from now on I will be considering this sleeve lining issue at my planning stage. I had to hand stitch the hem and the sleeve linings to the velvet outer and here is where I gave up. By then it was May and it was  very hot so I was not going to wear this coat for months so I just put it aside till now. I also hate hand stitching anything!
But then November arrived and I started to think of caots again. It was not too cold yet but I knew it would be soon, so time to get round to finishing this. Despite my extreme hatred of hand stitching I could really do with a nice new (warm) coat and this is going to be useable for normal life ( work) as well as for my weekends so I really have to get my act together and get on with the job.

When I eventually went back to making this coat I decide not to make buton holes as I had originally intended. I would probably have put buttons on this coat had I not left it sitting waiting for so long, but I was bored and did some searching for frog fastenings back in the spring thinking perhaps I could incorporate them into some as yet unknown steam punk outfit. Then I came across the Jane Austen site.

This inspired me but I still did nothing about making any frogs. Summer came and went. My coat went in and out of my stash pile but it was hot and dry and I did not need a warm winter coat.

Christmas came and I finally got round to actually experimenting with making frogs.

So instead of buttons I decided to have a go at making frog fastenings because they will compliment the black braid trim around my sleeves. I spent weeks looking at the Jane Austen site as well as numerous historical sites where there are images of frogs. Then further weeks watching You Tube videos on making frogs. There are lots of videos it turns out but back in June I had bought dressing gown type of cord for no particular purpose but just because it seemed a good idea to own some. The videos all seem to use parachute cord. Well I have what I have.

Is it going to be too thick?

Who knows till you try it out!

I should have taken lots of photos here but forgot in my concentration with making these but if you did fancy making frogs there is loads of info on the web.

So first I made two knots for the buttons and then made them into frogs and then two more frogs with no button, Then started to pin them on my coat. I decided  only needed to make 4 of these. That is 2 each of the button ones and two of the loop ones. Thats really because these are very big frogs due to my cord being dressing gown weight not thin stuff usually used but I reckon they work fine and I bet in the " olden days" when these were the norm they used all sorts. I read you can make them from thin tubes of fabric but my velvet would be too thick I think so better with this cord ( and easier!).


Have to say I usually rush to finish most projects because I want to post about them and do regular posts on this blog but maybe I need to now take longer than a week over most projects because the end result of this coat is lovely.

At this point its a great thing I did not get round to sewing in my lining because I needed to undo the small bit I did sew of the hem lining, to sew these on and get a decent finish.

 So this is my final coat:


So to make this this is the order in which I worked to make this coat:

I started as the pattern tells you by sewing up the outer and the lining. Then, first the sleeve linings attached to the sleeves and by hand stitching – which I absolutely hate. Then I started to do the hem but my haterd of hand sewing stoped futher progress. I had to undio the hem I had actually got round to sewing in order to add the frog fastenings.

First though I needed to actually make the Frog fastenings - making took a day but thinking about this probably 3 months!

Then Frog fastenings to attach to the front of coat- this was very tedius and took me two days of hand sewing them on.

Then finally finish the hem which took a further two days.

And this is my best coat yet!


Its also quite nice to make something bigger because generally my projects are easy, and fast, and done very quickly but this has taken me ages and loads of thinking about how to do it.

Its been a real challenge in fact but I think the result is worth all that work.


Best of all is the frogs do actually seem to really work to keep the coat closed. Of course I have yet to wear this on a windy day but so far so good and I am very impressed with them. I expected to need to add hidden secret press studs but there is no other fastening other than my very amateurish frogs. I will be making more of these on future garments now because I love the way they look even with them being very imperfect.

Ah and incase you wanted to know I am also wearing my sailor trousers  ( I had to take them up a bit after the original post!)


purple top


and anarchy gloves with this coat!


So what do you reckon to my new coat?

Thanks for visiting my blog,

Bracken

Monday 7 January 2019

Navy sailor style trousers


I bought the pattern for these trousers when it first came out so at least a year ago if not more. I bought the fabric as a remnant from ebay. It is a dark navy canvas of unknown fibre but I think contains some kind of synthetic mixed with cotton because it seems not too bad at creasing. The proper brass buttons are salvedged from an ancient 1988 coat which has now been recycled.

I actually took these up by another cm after taking these photos since I decided they are just a little too long and when measured against my other wide leg trousers that is the difference in length so I decided since I have been wearing these nearly every day for the last year or so that must be a OK length for me.
My previous wide legs
 I have yet to wear these to work which is what I made them for. They are a bit too boring for every day life but nice and upbeat as work wear. I can get away with them in an office! And I will feel better than if I wore something more ordinary. More interesting also than my previous basic wide leg trousers.

 
Unfortunately  the photos do not do these justice at all so I will be trying to get more and better pictures taken at some point soon to update this post. You cannot see how they are constructed. As you can see from the pattern envelope they wrap around from back to front giving a side panel impression but this is really all one back piece. 
Image result for burda 6573
 I am also not the best model!

These took a long time for me to finish because I cut them out in February 2017, sewed up in June 2017 and then got stuck at the waistband. I went back to them over Christmas only to find the waistband is really very easy. They do not at all go together like "normal" trouser patterns because you sew the inner seams before the side seams which threw me completely but really they are actually quite simple to make and I intend to make a second shorter pair using the other view of this pattern because I like them very much.

Its really a shame it took me so very long to sew them up because similar styles are suddenly in High Street shops and in fact I cut these out a year ago when they were more unusual. Still that should be a lesson learned!

If you want a pair of this style of trousers I would definitely reccommend using this pattern to make them.
Thanks for visiting my blog
Bracken