Monday 31 August 2020

Burda dirndle dress

I decided to make this in January. Its a dirndle dress that I bought from the german Burda Style site ages ago. Its style 120 Burda Style 07/2010 and I bought it as part of a Buy one get one free offer. I never got round to it because it really does not fit into real life.  I just could not visualise it in any available fabric until I found the black powermesh which was bought to make underwear, but never mind. I cut it out just after Christmas and started to sew it up. Then I got stuck. I did not like the top that is part of the dress. Its a fake dirndle blouse that fits into the mock corset and it looked rubbish so I removed it having spent weeks trying to make it work.

So by then its about March. Lockdown had begun. Still this dress sat there in bits (and in the way!) with me not knowing how to finish it. The mock corset bodice is stretch woven faux leather. I have previously made several pairs of leggings and a skirt from this. Oh and a top which is a bit old now but one of my favourites ever and a dress. The dress was the least successful. I wear the leggings loads. I may make a second pair of green in fact. Maybe with contrast black sides, since I still have lots of the green left and this stuff will of course decay so I do need to use it all up.

Previous experience has told me this stuff is very diffcult to hem. Especially round curves. I thought about stretch velvet elastic, stretch lace and varous different hem options but I could not decide how to finish the edge of the top. I needed to somehow finish the neckline of the leather bodice without making it crumpled looking because its hard to hem this stuff so in the end I just overlocked the edge and turned under once. Its not perfect but I am happy enough and it really does not look too bad when on me.

The skirt and what would have become the mock top are made from powermesh over a stretch lining. I should have made the lining wider. It works but I have loads of it and it would have worked better I think and looked more floaty with a wider fuller lining fabric.

Anyway this dress is sitting there and how to make it work. I showed my partner and he says it just needs one of those little tops they wear in Germany. Well yes its a dirdle! and I already have lots of those Carmen type of tops so I tried it on with one and its really good. Not quite a classic dirndle but worthy of wearing to Oktoberfest. And my stretch faux leather "corset" is far more comfortable than proper corset tops!

So with my skull top:


And a major advantage is it can have several different tops under it and so different looks.

This is my gold top:


Or even with a T shirt which looks like a great Halloween outfit:


I am not so sure this will get too much wear really, though it does have a great Goth vibe with the mesh skirt.
I have always intended to eventually make a dirndle of some description.
Well how can you not if you keep reading Burda?

All I need now is an Oktober festival to wear this too or maybe a Whitby Goth festival ?

Stay safe
Bracken

Monday 24 August 2020

Basic close fitting top with FBA - version 1


So this was my first FBA made on the top pattern using the Melissa Feyr top blocks from the Make Your Own Activewear book. I added a bit too much adjustment meaning the top has now got too much fabric but its a good start. I wore with the same trousers to make it easier to compare the two tops.

As you can see from the picture here (below) I have an issue with the basic top (without FBA) pulling accross my bust which probably means I need a full bust adjustment

Well I was told this by Karey a while ago now with a jacket I made a mess of. I have kept that jacket so I can refer back when I remake it. Its a princess line pattern so I am not going to try altering that one just yet because this is my first FBA attempt and I made a bit too big adjustment I think, so I need to do a second one and get the amount I need to add into the bust correct before going onto any more patterns. Its certainly more comfortable though even though its now got too much fabric accross the bust!

You can really see this on the back of the second top:

This is an easier method than the method for FBA given in the book ( or any of the YouTube videos I have watched!) and defiitely works. You just pivot and redraw and its easy though from this make you do need to work out how much needs to be added. I probably should have worked this out before but never mind. I will get there eventually.

I ended up adding too much because this top is now definitely too big accross the bust. Doesn't matter because I will just make another one. Being in the same fabric as well really helps to show what is happening here because it seems to me you can buy what is sold as the same fabric in different colours yet it does differ. I have tons of this coral stuff so its a really good experiment to try this out now. This is a really good thing for me to learn though and is probably my natural progression sewing wise.

The problem is I do not fit one size and thats why my tops keep not fitting - or some anyway but then I suppose thats why you are meant to make a muslin of everything first. Also unfortunately it has proven that changing fabric can also mean it fits totally differently. You can see this by comparing the not good fitting top with the identical surfing top I made in a different fabric and yet the second top does fit well. Its very frustrating.

According to the adjustment I am on the upper border of a size 6. I  measure 79cm upper bust, But I am bust size 85.5cm which is a size 10 then waist is 68 so that makes me a 8/10. Well I suppose that explains why a basic block does not fit right!

Well my block for this top is a size XS which is meant to be: Bust 86cm waist 66cm.

Finished measurements are also bigger than this ( bust 100 waist 95cm) so I expected it to fit.

Well from the photo no it doesn't!

I did not really want to do the FBA twice so added the maximum of 10cm ( two sizes) which means 2.5cm at each armscye. It was a mistakebecause its now too big.

I am going to just add 5cm total to my next attempt. I will get there eventually and whats the worst can happen?

I end up with loads of coral tops for winter. Because despite some fit less well than I hope the final one does I will still wear all of these. And thats despite my not even liking the colour!


Well under a jacket with work trousers these will look OK though my workmates will think I never change my tops 😊


This does fit better - not pulling etc, but now its just too big and it feels too big. Theres too much fabric flapping around under my arms which is hard to see here. This is though meant to be a CLOSE FITTING top.

I will let you know how I get on once I have done version 2 of the FBA on this top. Hopefully the next version will work. The trouble then is I suppose I will need to do FBAs on most things I make. Thats going to be annoying, though I suppose I will just get used to doing it. Its a bit like tracing your Burda patterns - you just get into it.
 
Thanks for reading
Stay safe
Bracken

Monday 17 August 2020

Short tube skirt

This is another tube skirt made from just the front pattern piece of New Look 6230. I made this type of skirt several times before and prefer to a more formal pencil skirt which this pattern  is meant to make. It works for me.

The fabric used for this skirt is just a small piece left over from my green snakeskin dress and top - or dress depending how you look at that outfit. ts cotton lycra jersey so ideal for this kind of garment.

This is a great stash buster pattern as well, because its hard to find ways to use very small pieces of fabric other than making underwear and I think I should get at least one pair of knickers out of what I still have left anyway, and how many pairs of green snakeskin knickers do I really want to make?

This is a bit longer than the black velvet skirt made exactly the same way. I made a couple of other skirts as well back in spring time.


Other short skirts made from this pattern:
https://brackencrafts.blogspot.com/2019/12/short-sporty-sequin-sided-skirt.htmlhttps://brackencrafts.blogspot.com/2020/01/polka-dotty-dungaree-skirt.html


I suppose I could also wear the one shoulder top which makes up part of my dress with this as well but I have not tried that out as yet.


Thats actually down to how big the fabric piece left over is though. I reckon use it all because its less wasteful so this is actually possibly even wearable for work on the right day.


I am getting converted to these kind of tube skirts. This is really quite funny because if I did not make these myself I would not waste money on them but when they are a by-product, so to speak, of something else I have made I enjoy them very much.

This will also work for warmer days in Autumn or with tights and boots on colder days so I feel my winter wardrobe has started now too.

Take care, stay safe
Bracken

Monday 10 August 2020

Vintage trousers updated

This was a small alteration really, but this has taken me weeks to do. I decided I just could not handle the Baggy Arse look of the original trousers.

After altering

I had to completely unpick the trousers- waistband facing, top stitching, stitch in the ditch stitching, overlocking, crutch, tops of legs etc.

I gave in when it came to unpicking the leg seams due to the top stitching, overlocking etc and to be honest I had just had enough by then. I just undid what I had to to get the bits appart.

It had already taken days to get that far.


I destroyed the invisible zip getting it out because I hate back zips and intended to have a side zip instead.

In the end I decided to go with the back zip anyway and bought another one to put back in. I had to wait for that to arrive as well, and then it went missing in the post. It did turn up eventually.

The back zip is still not quite straight but will pass I think. I suspect I have stretched the back fabric with all the taking appart and resewing.

I undid both back darts and redid. They are better I think. I think they are now straight anyway so thats fixed.
My baggy arse!

The main alteration to get rid of my baggy arse was to use a different pattern to get the right shape round the crutch. I ended up comparing the pattern from my much loved and worn most working days, trousers made from Burda style 7122.

By using the  pattern pieces I could discover where the Rebecca Page pattern is different and have to say they are very much the same so you only need one or the other pattern. Both have their good points. The RP pattern has fantastic directions on how to make trousers so if you have never done this before its probably worth buying, but the RP pattern does not fit me well.

The Burda pattern has pretty rubbish directions but fits great. RP has a higher waist by about 3 inches so 7.5cm higher. Thats a downside for me because I am not a fan of high waists, but high waists are very popular. I left that alone so I still have the high waist.

Other than waist height the fronts are actually identical ( remembering when measuring to take into account anything cut off by overlocking the insides as well as the seam allowances). The backs though are quite different. The crutch curve is much less on the RP pattern. I decided having got this far to go for it and hack off the extra bit. Even then I was conservative in my hacking and allowed an extra bit for messing around if this did not work. I suppose I could actually ahve taken these in further infact but I decided to stop once they looked reasonable. In the end I cut about 2.75cm off the back crutch on both pieces and graded this to match the rise at the top. I should have taken photos. At the time I was busy working this out and not thinking of expaining it to others. If you can visualise the back crutch and how it curves up to the waist its the largest curve where it goes round the bum and between the legs that needed to lose the fabric. The waist bit of the curve is OK. So where it goes over the top of the buttocks is left alone. You hack off the inner curve. I hope this make sense if anyone needs this explained better please just comment and I will do a drawing.

 I then resewed using my usual method not the RP method because I think I get a better finish and I end up with my seams all aligned which I found impossible using RP method. Thats probably just personal preference though and being used to doing it differently. Practice and all that. I usually sew each leg together, stick one inside the other then do the crutch seams as one long seam. RP sews each front and back crutch then the side seams. This gave me mismatched crutch seams.

Anyway my method works because these now fit much better although really I am still not very happy with them. I will probably not bother with this pattern again because I have better and am upset about not making a good pair of trousers from this fabric which was quite precious. I want perfection these days and usually manage pretty close. They "will do" though. They make a decent work trouser and I am sick to death of fiddling around with these and want to get onto something new and also if I keep fiddling they will probably end up in holes and in the bin. They are wearable, and since I never tuck my tops into my waist no one else is going to see my slightly imperfect waistband / slightly sloping zip are they? Time to stop!

So the end result?


Well to most people my trousers look exactly the same. The front has not changed. They just fit better around my rear.

And they feel better so I will wear them now and thats what its all about.

And I have started my return to work wardrobe which I need asap because I go back on 10th August.

Take care, stay safe
Bracken

Monday 3 August 2020

Swimwear for surfing


I decided to make the rashguard top from the Make Your Own Activewear book by Melissa Feyr. To go with it I also made some BIG knickers. Well the UK sea is cold. I actually own a wetsuit but its really hard to get the ankles on and off and I pulled my operated leg a bit badly before we went to Cornwall trying it on so I decided to make these instead and not hurt myself using a too small wetsuit.  I think probably I really need to top and bottom to be seperates anyway. My old wetsuit is probably a bit small because its at least 22 years old. Its lasted well for a cheapo suit from Newquay. I really need a new one tho I am tempted to try to make my own. I was shocked how small it was when I measured against my currentclothing. Chld sized. But then I bought it around 1997 and last used it about 2002, I never though I had got that much bigger because I still wear clothes from the mid-a990s but I must have because I would be very "bulgy" in my old wetsuit now.

 I was so happy to go body boarding I forgot to get photos taken on the beach. You get the idea though!


Since they let us out of lockdown and we can now go on holiday, this was all a bit of a rush job and no time for attempting to make a proper wetsuit. We expect/ hope to be back at work soon so no time to waste to get a holiday in.


I actually did this right for once due to my expensive precious shark fabric so I started with a proper muslin made of cheap coral stretch fabric. However since seeing the photos of the muslin I decided it did not fit properly. It pulls across the chest.

I never saw photos tho until after I had actually made the rashguard. I just looked in a mirror. Just shows you, photos are much better for gauging fit.

Interestingly and probably down to the different fabric, the rashguard does not need an FBA where as the muslin did. Its all very confusing for me to be honest. Other than I added a bit of length there is no size difference.


I have previously made a skirt from this pretty nasty crepe stuff. I used it for the lining so you do not really see it.

I must admit the colour is slowly growing on me!


It was surprisingly wearable on holiday.

The book tells you to add an extra bit of fabric under the arms. So having found the basic close fitting block works ( or so I then thought) I altered the block to make the under arm gussets. 
You can see the weird Vs here.

Then though I am not so sure I have sewn these up right to be honest, but they do work by not pulling up the top from your hips when you raise your arms.  Have I sewed this up right?? 
It does work when on the Vs just tuck inside the sleeve under the arm and is not seen but should the extra Vs be part of the body side seam or sewn as I have below? 

A shoe lace serves as a pullcord to get in and out of this top.
 I realised I had not enough fabric for two sleeves so used some textured scuba for one sleeve and round the neck. It was the only available appropriate fabric so that was the choice.

For the neck I reversed the fabric so its smooth because I reckon the texture could cause chafing when wet.

Then as I started to sew I had a disaster.

I caught the top in the overlocker making a small hole far too far down to just make the neck bigger. I have read of other bloggers/sewists doing this but never done this myself before. Well its quite typical I suppose!

A disaster on the most expensive fabric I have ever used!
 
 After some upset and much frustration over ruining my fabric, and not having any more and probably not being able to get any more anyway because its from Ebay back in January when I was pattern testing for Ralph Pink, and I want this done today because I go on holiday tomorrow, I decided to use a scrap of the textured scuba left over from my black sleeve as an insert giving a colour blocked effect. As it turns out it works really well and also ties in my contrasting sleeve.

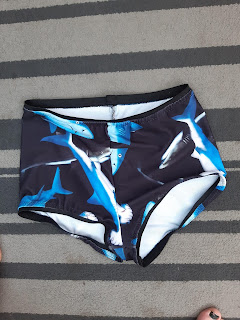
I made the knickers using New Look 3239. They have a front lining which is great. I constructed using the same method as my basic thong.


I have previously had a problem with zips on stretch fabrics for example on this top, which I love but the zip is far from perfect. 


To avoid having a wavy zip this time, I added a small strip of interfacing along the  back edges to stop the zip from going wavy while I sewed it in, which worked a treat. It just needs to hold my fabric in shape while I sew the zip in after all. I used this method previously for my reversible skirt.


Its actually quite hard to see here when the top is wet but the zip is nice and flat.


Incidentally this is a woven not knitted interfacing thats meant for knits. I had lots of small off cuts so just used that. It will not after all matter if this falls off later.

The interfacing goes under the zip then the facing goes on top so that once the facing is added its not seen at all. 

I am very happy with the end result of this project and my suit worked really well in the water too. I think having tried it out in the sea, I would go down a size next time and perhaps possibly do a FBA to make it fit because the lower body was a bit loose really. Though as already said there is no fabric pulls accross the bust with this top even though there are with the muslin.  I find this FBA stuff and fit issues very confusing because my muslin needs an FBA (I think) and yet this top is large on the body but doesn't need an FBA unless I make the smaller size. Ahhh!


Best of all I have actually started to use my book to make my own activewear. Since I bought it for my birthday in 2019 its been on my shelf for a whole year without being used other than flipped through and read that is. Also thats another one of my New Years Resolutions done - to use all my patterns/ mags/books etc at least once.
Thanks for popping by,
Bracken