Tuesday 27 September 2016

66: Finishing the UFOs - waterproof jacket


I started this jacket for my partner back in June with the idea we were going to take it on a day trip at the start of July. When it came to our day trip it was very hot and there was no sign of rain which was good because I never finished making this.

The fabric is a ripstop waterproof, probably nylon. I do not remember to be honest. I bought it from Ebay so was relatively cheap.  I think around £5 but cannot remember exactly. I have loads more left for a second jacket.

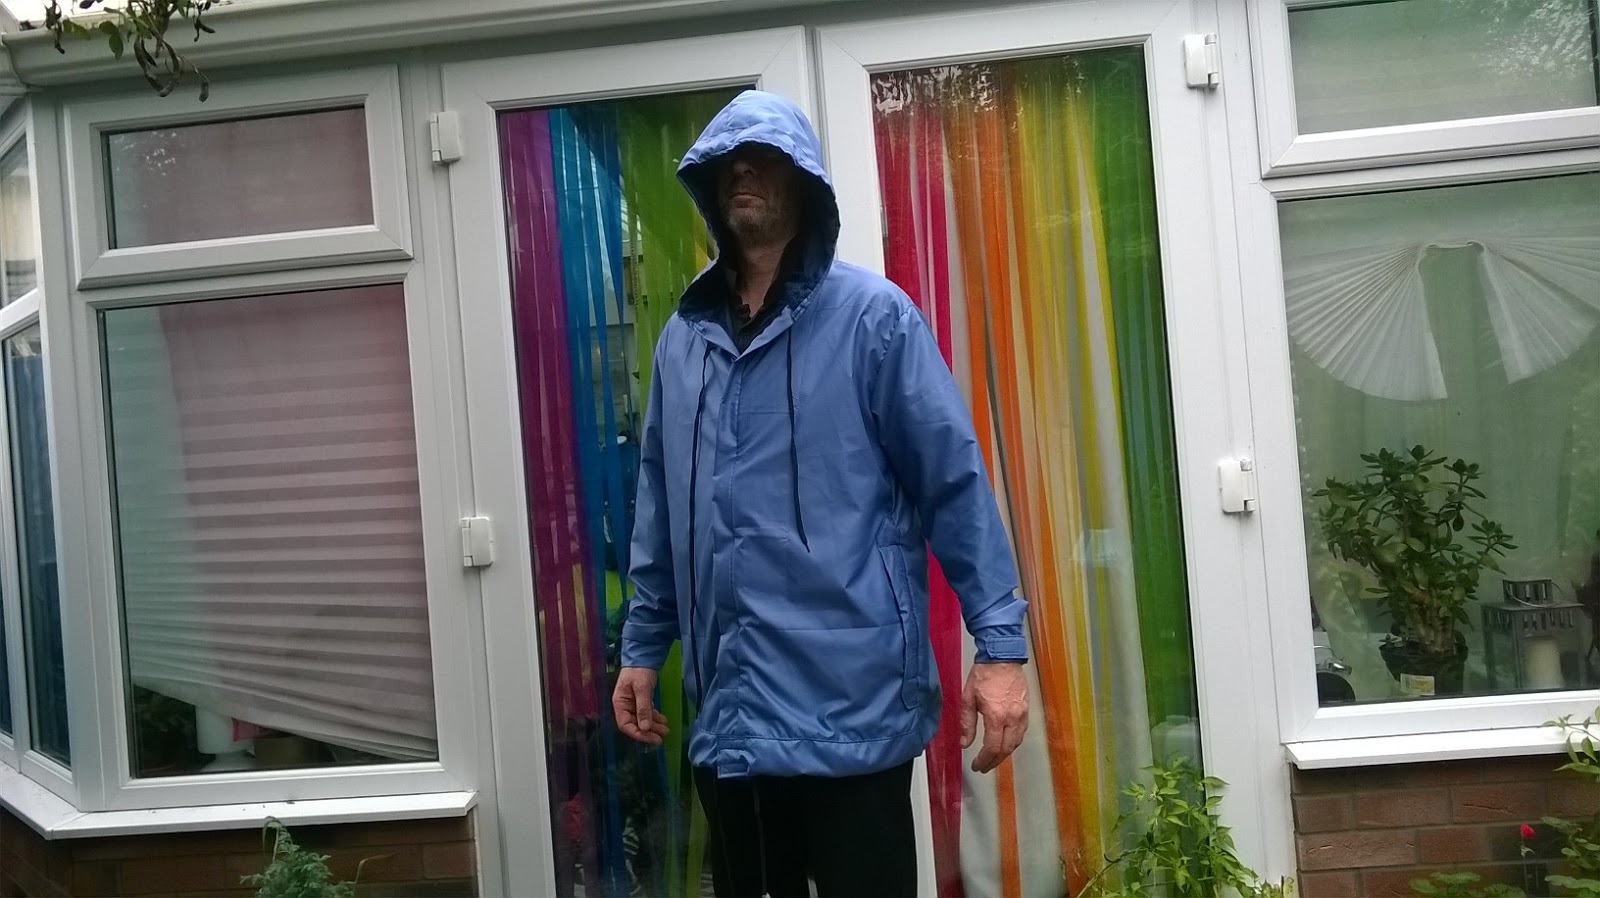
The jacket is based loosely on a hoody pattern:

New Look Pattern 6142 Misses' & Men's Separates:
 The lining is navy mesh - I will add a picture later since forgot to take but its just a nylon mesh fabric meant for sportswear linings.

I added pocket flaps to keep the rain out and closures with blue velcro:


 The velcro is from Amazon and was £7 for 25m.
I found it very easy to sew the fluffy side but really difficult to sew the gripper bit. The needle just refused to sew at all and my machine said it was too thick fabric so I swapped to a leather needle. It sewed better with this but still kept missing stitches. I eventually got it all sewed on but it was very difficult and frustrating.
 I added a piece under and over the zip to hopefully keep the rain out and added extra fabric around the hood edge to hold a cord.

This made the hood large which apparently is like "Assassins Creed - Almost" according to my other half! He likes it anyway.


 The front has velcro at the bottom which I have to say looks far from professional here:


This is the main problem area because I did ask him if he wanted the pull cord to have eyelets (buttonholes) but he said no so when it is finally finished the cord now needs stoppers since the two ends do not meet up when the bottom velcro is closed. One end of the cord is on the inside and the other outside. Hopefuly that makes sense.

I made a mistake with one pocket shown here. I had to decide which would show least the top or bottom so I have a pucker at the top where it does not quite fit. I sewed the pocket flap ends down so hopefully they keep the water out and my partner's phone, keys etc safe with the velcro fastenings. He has a habit of losing phones in the sea. I know I never take my phone when paddling but he does!

I decided better to live with this pucker rather than unpick since if I unpick there will then be lots of tiny holes and it IS meant to be waterproof. Other half does not seem to even see it despite my pointing it out to him!

To make the sleeves long enough I added wristbands with an adjuster bit based on a  RTW jacket I already own.

 The wrists are closed with velcro since my other half did not want elastic wrists.

This jacket took me well outside my comfort zone and is I think, if I am honest, well above my skill level hence the problem areas such as the pocket flap being puckered. I needed to be quite inventive since the pattern originally has no lining and is meant to be a reasonably fitted hoody rather than a waterproof jacket. I had to invent extra bits to try and make the water remain outside in a downpour. Having said that though it is a good prototype and in interesting experiment. I also had no actual pattern pieces for bits like the front flaps that go under and over the zips, the cuffs, pocket flaps and hood cord channel or the hem band. All sound reasonably easy to add but when I came to do this getting them perfect was very difficult.

 We have yet to see how successful this jacket will be. I will let you know once its been seriously tested. We are off to Cornwall for a few days soon so that should show if it is actually waterproof. I suspect everywhere I had to restitch due to skipped stitches it is going to leak. We also never glued any of the seams so in a heavy downpour I think the water will just come in. We will see. If it turns out reasonably successful I will make a second jacket What I really need is some kind of, preferably mens, waterproof activity jacket but I have not been able to find a pattern anywhere so if anyone reading this knows of one please comment or email me and let me know.

Here are some pictures of close-ups of the lining and zip etc :


Thanks for visiting and see you again soon,
Bracken

Wednesday 21 September 2016

knitting update - Time to finish the UFOs


  I updated this post with a jumper picture and with me wearing this since I decided you cannot actually see much from the original photos.

I started this bat wing jumper back in february I think.18: Wonderful people and easy knitting bat wing sleeved jumper or sweater

I had half knitted it when I made the MeMade May challenge
I need to make a confession here that I never achieved my challenge and this still remains unfinished. I did wear something MeMade every day in May and often several items at once but I said I would finish it as part of Me Made May by the end of May which at the time seemed an easy task. Then I just never seemed to finish it. The yarn is kind of fluffy mohair type and it got too hot this summer to knit it ( excuses excuses!).  I made loads of sewed clothing but never managed to get back into this. Then a couple of evenings ago I picked it up and dropped half the stitches. I have picked them all back up again now and am finally on the second half.

 This is one side with front and sleeves as one piece so it should really be an easy make.

I think realistically I need to finish this now because its got to the stage it is stopping me from finishing other projects and also I could do with this for autumn so my challenge for the next week or so - I am not a fast knitter even when I get dedicated - is to finish this jumper so I can actually wear it and maybe to begin a different one. 


This is what I have knitted so far of side two. I am just increasing along the sleeve to make the bat wings. It gets very big so to be honest if it was in a heavier weight yarn I would find it hard to knit it but because its light fluffy stuff its actually ok.


This is the 1980s pattern the jumper is knitted from. To be quite honest though, and despite my good intentions to stick to the pattern, I started to ab-lib about one third of the way accross the first half so its not the same as what I have knitted. The increases and decreases and stitch numbers are of course the same but maybe it is my colour choice but I found I did not want to continue with the pattern colours as they are meant to be  so I started mixing them up a bit. Made for a more interesting knit and also original. I suspect it is very unlikely I will ever meet anyone wearing a jumper made from this pattern because it is early 1980s, and cut from some magazine I do not even remember the name of,  but by changing the stripes and blocks a bit I make dead certain this will be completely original. Also because on the original pattern the front and back are different to each other ( and look good) it does not matter if they are different here so really there is absolutely no more excuses I can find to prevent me from knitting this and until I do I am only going to sew UFOs. I have a few of them still sitting waiting as well. So for September at least, and possibly also October I am going to clear out my UFOs and not take on any proper challenges. Of course it could just be if I am lucky that one of my UFOs will fit into a challenge.


Thanks for visiting
Bracken


Tuesday 13 September 2016

65: #Gingham along jacket construction continued

I have already posted my gingham items in my last post
but for anyone interested this is a bit more on the construction of them.


This is the back frill. Sides now sewn up as the pattern says.


You can just see the gingham pocket lining here :

 No idea why but I decide to twin needle stitch the frill but did single row stitching for all the rest of the topstitching. Slight mistake there!
 The collar has a pleated faux leather frill which was quite difficult to stitch since the layers were a bit thick for my machine.
These are the sleeve frills. The pattern says to pleat the middle bit as shown and then to gather the rest into the cuff but the faux leather was just too thick and refused to gather at all so I ended up having to pleat the rest into the cuff as well.


  I had loads of problems with the leather straps. They are all slightly diffrent to each other. I could not get them to look even and in the end decided to live with them as they are because when wearing they move around anyway so will never be perfect and really I already unpicked them twice and its not good to do this with leather/faux leather so no they are not quite right.
The back strap has two small vintage silver rose shaped buttons which came from my long dead Great Aunts. 


I lined up the top stitching on the back of the sleeve with the top stitching on the side back panels. The first one is not quite perfect but the second one was dead on. Again I decided to live with this. 


And this is my final outfit:


I can see me wearing this alot but maybe not for work!
All in all the gingham along sewing has been very enjoyable and I would do it again. It caused me to seriously stretch myself rather than just making the same old safe but wearable stuff I usually make. It also made me think about how to use this piece of gingham I had obviously liked when I bought it but could not see myself in most gingham clothing. Making it a bit more Goth/punk really made me want to wear this. I found several things about this pattern I would change if I made it again, which I may do or maybe the View A rather than this one which was view B,  the most obvious change would be to add a lining because this is an unlined jacket. I could also do with learning how to grade a pattern down because this fits accross the shoulders perfectly but really is a little big round the waist.  And its the most difficult thing I have sewn in at least 20 years so was a real challenge!

Thanks for reading
Bracken

64 and 65 #Gingham along items


So here are my Gingham along items at last. I will do another post on how I completed them this one is really just for the Gingham along entry.

They are all made from some kind of synthetic mix stretch gingham with stretch faux leather. These are the patterns:
McCalls M6612
Simplicity 1299


Hope you like them
Bracken