My name is Bracken. I live in the UK. I make all sorts of crafty things but mostly I sew so this is a blog about making lots of garments and becoming who I really am after many years buying ready to wear. You will find the odd recipe for food and cosmetics or also knitting on here as well as sewing.
Tuesday, 22 December 2015
9: Brightly coloured knitted jumper
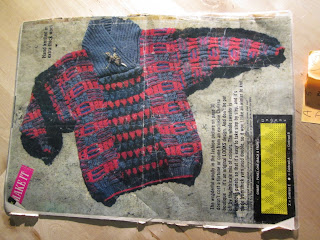
This is a 1980s free pattern.
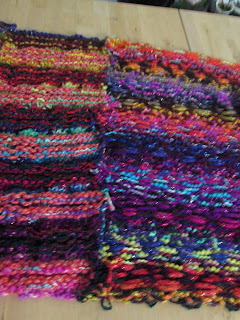
I cannot remember which magazine it came from but it was a fashion mag rather than a knitting mag. I knitted it first in 1986 when it first came out. I know what year despite there being no dates anywhere on my pattern because I was working at a kennels which I loved but I got paid very little and I only worked there a short while before getting a better paid job. Anyway I made it twice before. The last time was probably about 1989. Both times I made it in the right guage of yarn. This time however I have made it in the smallest size but in super chunky yarn which uses 10mm and 8mm needles. I bought this lovely yarn in various colours but could only find limited patterns for it and most of them were for scarves and infinity scarves. Well sorry to all the scarf enthusiasts out there, but I find scarf knitting very boring and always have. I have yet to actually finish a scarf. Jumpers or sweaters though I need so I find the incentive to get on with it and finish. Each yarn is a rainbow yarn that changes colour as you knit which gives the already multi coloured fairisle and textured stitches an extra something.
pattern here:
I am unsure how much of the pattern you will be able to see on screen but I shall write this assuming you can decipher everything and if necessary I will re-type the pattern later. If anyone needs the directions please just email me and I will type this out for you.
Unfortunately I liked this design so much - its very easy but looks complicated - so years ago I laminated it so it is very difficult to photograph and you simply cannot scan it. I especially want this particular jumper too since I have only one hand knitted jumper which goes back to 2004 and all my others are machine knits. To be honest now I have embarked on my somewhat huge journey making garments I only want to wear hand-made. Not necessarily hand-made by me but hand-made all the same. And every other time I made this I loved it above just about every other jumper I had.
My colours: All yarns from Aldi and Wilko in the UK so very cheap yarn. All super chunky with suggested needle sizes of 9-10mm. However, it is also reasonable quality and washes ok going by previous experiments with it when I knitted some gloves a few years ago which wear washed and tumble dried quite a lot and are still going although definitely a bit worn now. I also knitted some baby clothes fro my friend's new born and they were washed loads and stood up to it so I think Aldi yarn is ok for the price and for this jumper.
Changes to the original pattern include doing just the textured slipped rib stitch for the sleeves and not the cable as shown. In fact I have never done it with the sleeve cable since it seems a bit strange to me in this pattern but could be nice if perhaps done with contasting cables so one half is one colour and the other half another making a twisted rope kind of look. If you know what I mean. Not sure that is very well explained so sorry about that if it does not make sense. The rib pattern is in blocks of 10 stitches so its pretty easy to work it to miss out the cable and just have a ribbed stitch.
The pattern uses 5 colours but I never have but I also miss out the cable on the sleeve.
You knit the centre front and back panels using the following chart and 4 different colours although I have always used up odd balls and adapted so I do not necessarily do the ribbing in the recomended colour if I am running out of yarn.
I just adapt because this pattern is very flexible and will still look brilliant once finished.The rows up the side are numbered in ODD numbers 1-11 which is the number of repeats. You knit row 1 and purl row 2. Then knit all odd rows, purl all even rows.
I did the main body panels which are the fairisle bit in the recommended (for the yarn) using 10mm needles and they worked well. Not too loose or too tight so the best needles for this bit, but when I came to do the side panels the knitting was just too lose using the 10mm so I sent for some 9mm and 8mm needles. In the end I used the 8mm needles although maybe with hindsight no 7mm needles might have been even better but I wanted to get on with this else I might have tested a swatch of the smaller size. If you do this pattern it may be best to experiment a bit.
I used normal chunky yarn for one of the contrasts. I just used it doubled to give me the bulk. The recommended needles for this were 5.5mm so when doubled it is OK with 8mm for side panels and works well with 10mm for the fairisle.
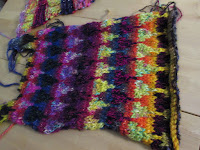
You knit the side panels seperately and then sew it together.
The sides and sleeves are in a textured rib stitch which is basically an alternating slipped stich so pretty easy.
The original side panel I knitted in 10mm needles which came out too loose, I kept incase I needed the extra yarn. More of this later.
Finally you do the ribbing and the bottom and the neck edge. The pattern uses a cross over neck style which was really popular in the 1980s but personally I never liked this.Neckline: on both my previous versions I did an open neck with a collar. This time I am doing a normal crew neck.To do this instead of following the pattern I shaped as a similar crew neck pattern and cast off alternate rows until I got the correct number of stitches. Since the jumper was huge anyway I did not worry too much about how many stitches I ended up with. It would fit me anyway.
Sewing up the front and back panels: I found it easiest to use the many wool ends where I had cut off the different colours at the side to do the sewing.
To be honest I think sewing the thing up was the worst bit of this garment - all the seams to sew up. By using the short bits you also weave the in at the same time giving a neater finish.
Sewn up panels:
Neck: using 7mm needes I pick up all the way round and knit in a circle using double ribbing then I do one row of just purl so it will fold over nicely and then continue in the double rib until the neck lining is the same size as the outside of the ribbing. It makes like a self facing.
Then I just slip stitch it down. I did toy with the idea of picking up the inside neck stitches and casting off two stitches at once to avoid having to slip stitch ( no idea what this technique is called or if it even has a name) anyway the jumper was simply too heavy and I gave up doing this and just cast off using a size 10mm needle for the cast off row to allow for some stretch.
This is the reverse after I had joined in the ends and sewn up:
Hems of the jumper: for colour A I originally used two strands of a yarn meant for 5mm needles. The pattern says to do just one contrasting row on the cast on edge rather than a row in but I decided to do this instead and I am happy with it. Double rib is used for the hem and sleeves with a cast on in the main ribbing cvolour then two rows of a contrast and then back to the main colour again.
I decided I want the hem thicker since both times I have previously made this pattern the hem wore out first so this time I used three strands of the same yarn. This did mean I had to be careful when knitting not to drop one strand of yarn so it does not make it quick to do the hem. Also on both my previous versions (both made in the 1980s) I used a circular needle and knitted in the round for the hems. This time the jumper is just too heavy. So anyway I actually joined the bottom of the front and back only to change my mind and just knit half of the bottom ribbing. I still had the weight to contend with and the 3 strands of yarn, but not the huge number of stitches. So: I knitted both front and back ribbing seperately which does mean sewing them together but that is just like a conventional jumper so not the end of the world.
Both previous versions were in warm but light weight mohair and chunky yarns. This is super chunky and it has knitted up very heavy. Should be a very warm garment though. I have worn it once so far and was very hot in it. Havings aid that the UK has yet to have a proper winter and when/if it arrives this year I am now ready for it.
Because all the wools change colour there is a variation in every panel which to start with was quite annoying but once you get into it I really like the effect which is good because I do not really have time to start this project again.
This jumper is really all a bit experimental - or hit and miss depending on how you think - but its come together very nicely. It is huge and cuddly and warm which is what I wanted. It has a bit of glitter which I also wanted. It is multicoloured due to the design and also the fact I am using magic colour-changing rainbow yarn for all my contrasts except for on the side panels where one contrast is a tweed. Still its a very multi-coloured looking garment and will be warm for winter and just what I want for Christmas. At work we have a christmas jumper day but I do not really like any of the commercial "picture" jumpers and if I was to wear one I would want to make it. I do not currently have time and this project has been going on for too long already so the sooner it is finished the better because it is taking precious making time from my sewing projects. Anyway, most of all I just needed a big thick winter jumper before it gets any colder.
And finally just to finish off: the side panel I made that was too loosely knitted will make a lovely cowl/ infinity scarf. I just have to weave in the ends and I think I will join everything together with a couple of buttons. So after all I will make scarf too. It will make a lovely addition to my jumper and in the end it would be a right pain to have to unpick all the rows of different coloured yarns to rescue them for another garment and I hate wasting things. More on this once I have finished it.
Thanks for reading and hope to see you again soon,
Bracken
Tuesday, 1 December 2015
8: Burdastyle 09/2015 Hooded cowl neck dress
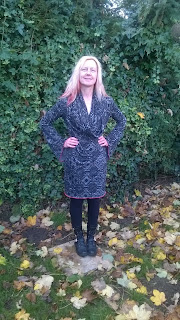
The new photos were taken very early on a winters day and it was blindingly sunny so please excuse the glare. You can see the dress ok but not me but then that could be a bonus!
This is the new version:
This is my original dress which I had so many problems with:
I am assuming my reader already knows how to trace a burda pattern. If not there are already lots of tutorials out there telling you the way to do this.
Try here:
http://so-sew-easy.com/tracing-burda-patterns/
and here:
http://www.afashionablestitch.com/2013/shop_talk/how-to-trace-sewing-patterns/
and here:
http://www.fehrtrade.com/article/99/how-to-trace-a-pattern
and I am sure there are lots more out there.
So I have my pattern traced. Its been pinned to my fabric and the pieces are all cut out.
For this version of my dress I have decided to try not to get too confused with the magazine directions so I am doing this my own way. To make life easier still, I have done the second version of this pattern and used a contrast for the hood facing which I suspect will make the construction somewhat easier.
Anyway here goes.
1) attach the hood facing to the hood.
This time I decided to use a different colour for the facing to try and make it easier to see what I am doing.
2) join the back hood seam
3) attach the back dress piece at the shoulders - this is the hard bit. First check fabric is correct side so as to not sew it on inside out.This is the part of this pattern I find the trickiest to achieve. Maybe I just did not trace the pattern pieces correctly or maybe they are just drawn slightlyout or maybe I stretched my fabric whilst cutting, but still at this second attempt the pieces do not quite fit. Of course it could be due to my having to cut half a pattern piece for my front and then move it along the table to continue cutting! Either way my pieces do not match right. You need to sew along the back neck first. Burda say to sew right accross the back neck and shoulders if I am understanding them right but it just will not work for me so first I sew the back neck and then each shoulder.
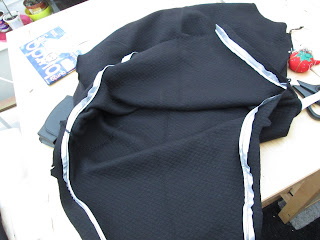
The picture below is of the hood joined to the back and you can now see the two shoulders ( without sleeves)
Turned inside out with the black hood facing outside showing where the neck opening is:
4) Insert sleeves. Sorry I forgot to take photos of this.
Make sure you also sew the facing inside with the sleeves where it is shaped to follow the sleeve opening. Ensure the fabric is the same way for the sleeve piece as for the dress body to avoid sewing sleeve on inside out. I have done this lots of times believe me. To do this I measure half way up the sleeve and use a pin to mark.
Then I measure half way up armhole which is not necessarily the shoulder seam but usually slightly off the centre. Then pin sleeve centre to the half way point. Then I pin each end of the sleeve. I am overlocking ( or serging) so then I just go slowly and line up the pieces and I sew. If I need to stretch one bit slightly I do so to get the sleeve to fit inside the armhole. I also use as many pins as needed to attempt to stop the sleeve fabric slipping away from the rest of the dress while sewing. Be careful not to sew over the pins since besides hurting you later when you try it on they tend to break your sewing machine needle.
5) repeat for second sleeve.
6) I now should have a front joined to the back and two sleeves inserted so just need to do the side seams. If you line up the ends of the sleeve and the hem of the dress and check the side seams all meet in the right places you can simply sew from one end to the other which means your sleeve and dress side seam are all sewn up at once.
7) Hem sleeves and bottom edge of the dress and you are finished. Or just leave unfinished if you prefer. I used a twin needle for this dress for the hem and the sleeve hems, but the original version was just overlocked. You can see the original dress ( top of the page) has red contrast overlocked edges which makes the sleeves a bit long. I do not currently want to shorten them though since I may yet decide to hem them since I have found that velcro on my waterproof jackets keeps catching on the overlocking and pulling the stitches.
I hope this helps someone else because despite Burda saying this is an easy pattern. I definitely have had several problems even when repeating it. Having said that I do love this pattern. If you have made this how do you like it? What changes have you made to improve the pattern?
Thanks for reading
Bracken
This is the new version:
This is my original dress which I had so many problems with:
I am assuming my reader already knows how to trace a burda pattern. If not there are already lots of tutorials out there telling you the way to do this.
Try here:
http://so-sew-easy.com/tracing-burda-patterns/
and here:
http://www.afashionablestitch.com/2013/shop_talk/how-to-trace-sewing-patterns/
and here:
http://www.fehrtrade.com/article/99/how-to-trace-a-pattern
and I am sure there are lots more out there.
So I have my pattern traced. Its been pinned to my fabric and the pieces are all cut out.
For this version of my dress I have decided to try not to get too confused with the magazine directions so I am doing this my own way. To make life easier still, I have done the second version of this pattern and used a contrast for the hood facing which I suspect will make the construction somewhat easier.
Anyway here goes.
1) attach the hood facing to the hood.
This time I decided to use a different colour for the facing to try and make it easier to see what I am doing.
2) join the back hood seam
3) attach the back dress piece at the shoulders - this is the hard bit. First check fabric is correct side so as to not sew it on inside out.This is the part of this pattern I find the trickiest to achieve. Maybe I just did not trace the pattern pieces correctly or maybe they are just drawn slightlyout or maybe I stretched my fabric whilst cutting, but still at this second attempt the pieces do not quite fit. Of course it could be due to my having to cut half a pattern piece for my front and then move it along the table to continue cutting! Either way my pieces do not match right. You need to sew along the back neck first. Burda say to sew right accross the back neck and shoulders if I am understanding them right but it just will not work for me so first I sew the back neck and then each shoulder.
The picture below is of the hood joined to the back and you can now see the two shoulders ( without sleeves)
Turned inside out with the black hood facing outside showing where the neck opening is:
4) Insert sleeves. Sorry I forgot to take photos of this.
Make sure you also sew the facing inside with the sleeves where it is shaped to follow the sleeve opening. Ensure the fabric is the same way for the sleeve piece as for the dress body to avoid sewing sleeve on inside out. I have done this lots of times believe me. To do this I measure half way up the sleeve and use a pin to mark.
Then I measure half way up armhole which is not necessarily the shoulder seam but usually slightly off the centre. Then pin sleeve centre to the half way point. Then I pin each end of the sleeve. I am overlocking ( or serging) so then I just go slowly and line up the pieces and I sew. If I need to stretch one bit slightly I do so to get the sleeve to fit inside the armhole. I also use as many pins as needed to attempt to stop the sleeve fabric slipping away from the rest of the dress while sewing. Be careful not to sew over the pins since besides hurting you later when you try it on they tend to break your sewing machine needle.
5) repeat for second sleeve.
6) I now should have a front joined to the back and two sleeves inserted so just need to do the side seams. If you line up the ends of the sleeve and the hem of the dress and check the side seams all meet in the right places you can simply sew from one end to the other which means your sleeve and dress side seam are all sewn up at once.
7) Hem sleeves and bottom edge of the dress and you are finished. Or just leave unfinished if you prefer. I used a twin needle for this dress for the hem and the sleeve hems, but the original version was just overlocked. You can see the original dress ( top of the page) has red contrast overlocked edges which makes the sleeves a bit long. I do not currently want to shorten them though since I may yet decide to hem them since I have found that velcro on my waterproof jackets keeps catching on the overlocking and pulling the stitches.
The next picture shows the cowl with contast lining with the hood down:
I hope this helps someone else because despite Burda saying this is an easy pattern. I definitely have had several problems even when repeating it. Having said that I do love this pattern. If you have made this how do you like it? What changes have you made to improve the pattern?
Thanks for reading
Bracken
7: Dark navy top with a step by step tutorial guide to making
Having made my warm black top I was going through and re-organising my fabric stash mainly due to complaints from my other half about the amount of space I am taking up storing it all.
Anyway I have 6 metres of this really nice navy knitted fabric. Probably fibre is acrylic. Its got a self-stripe which is quite wide. I bought this because it was a bargain at £3.68 with no particular idea what I would do with it. Then yesterday I had an idea because I am loving playing with my overlocker. I made two tops with the stripes sideways on this one and a second one with longwise stripes. I only took photos of the one though since they are identical really.
There is no pattern for these. I just cut rectangles and then angled the sleeves but this Burda pattern is very similar if you wanted to make one of these. You could also make an easy dress by this method by just making the rectangles longer.
http://www.burdastyle.de/burda-style/schnittmuster-unter-1-eur/longshirt-u-boot-ausschnitt_pid_1519_7181.html
I decided I wanted exposed overlocked seams on the outside edges though. Its that "old punk" bit of me I suppose! It would also work with the edges inside. In the end I have worn it both ways. There is a certain advantage to having something you can wear the right side when its inside out or right side out because there is never a wrong side.
- First of all to make this you need to measure yourself.
- Then some maths: for example for a 36 inch (91.5cm) bust: half of 36 = 18 (46cm) and add a bit on for comfort so say 2 inches (5cm) = 20 inches (51cm)+ seam allowance giving in my case 21 inches (53cm) wide ( if you want it baggy maybe up to 6 inches (15cm) so would = 42 inches (107.5) + seam allowance, but remember then you will need shorter sleeves)
- I cut out the pieces: front and back (identical rectangles are 20 inches (51cm) wide each and as long as you want. Mine were 29 inches long (71cm).)
- and two sleeves - also rectangles 20 inches (51cm) wide but angle in slightly at the wrist to make the sleeve narrow. Mine are 28 inches (71cm) long so that I can have either very long sleeves for keeping my hands warm or I can fold them back.
- then overlock/serged the shoulder seams.
- Then I overlocked around the neck and checked it will go over my head. It was a bit tight so I simply made it bigger by over locking again and cutting off the first lot of overlocking.
- Then I added the sleeves by pinning the centre of the sleeve to the centre shoulder seam and overlocking all the way accross. If you want exposed seams you need to check you have both seams on what will be your right side.
- Once the sleeves were attached I serged the side seams and sleeve seams together. I am very happy that all the fabric stripes actually matched up perfectly despite my hap-hazard method of making.
- Finally I serged all the hem edges and thats it. Finished.
It took probably about 30 minutes to cut and make each top. Since the fabric is thin I think they look great over patterned T-shirts or tops and I can layer them under thicker tops like my Warm black top I made a few days ago. I may make a few more of these types of too since I really enjoyed wearing one of them today.
Thanks for reading
Bracken
Friday, 27 November 2015
6: Warm black top with piping,
I was cold the last few days at work so decided I had to make a warm top to wear as soon as posible. I had this black quilted material in my stash again bought from Weston Fabrics on ebay. I am not too sure what the fibre content is but it has a small diamond quilting and is identical on both sides. Its quite a firm fabric and feels like it will be warm. Possibly a cotton/ polyester or cotton/acrylic mix? I already owned this pattern: Butterick B5679
Well if I had stuck to the original pattern it would have been even quicker since I decided to miss out the front and back centre seams. However I also decided to add piping around the raglan sleeves. See the last post about this.
In fact the hardest bit of this top was re-threading my overlocker with black thread. That actually took me nearly 3 hours to achieve! I still do not know where I was going wrong either so it is likely to remain threaded with black for some time I think.
Even with a few alterations it only took me an evening to cut out and about two hours to sew it up. That includes my struggle with inserting piping using an overlocker.
Well if you do try this it IS possible but I suspect better to first sew it in with a normal stretch stitch on a regular sewing machine rather than jump straight into overlocking. In the end that is what I did.
First I made the piping from waterproof reflective fabric which I had left over from making my two dog coats. That is what I actually bought this stuff for because it keeps them warm and dry being as it is waterprooof and also keeps us safe beacuse it reflects in car head lamps. It is similar to the ribbon tape on High-Vis Jackets. Anyway, where I live there are not many street lamps, and often the traffic drives fast through the village even though it is not meant to do so. That makes walking my boys very unsafe at night in winter. Since it tends to rain a lot in the UK as well and my boys are both 12 years old and feel the cold and have arthritus I made them these coats:
These are not the best photos but it is not easy getting them to stay still long enough for a good photo despite them being on leads. You can see better photos of my dog coats here: Dog Coat
I think since these are garments for dogs not people they probably should not really count towards my aim of 100 garments so I will simply add them in here as a project I made. To make them I just drew round some existing coats they had that are getting rather old and tatty now. These are a good design because the go lower down the back and around the tail keeping their sides, kidneys and rear end warm. Most dog coats seem to be shorter. They also have leg straps made from 1" wide elastic which stop them from moving around when they are wearing them. Most commercial dog coats do not have these leg straps and the coats constantly move and fall off sideways on the dogs. These are based on Bala dog coats which if you want to buy one I would recommend.
http://www.balafactoryshop.co.uk/pages/Dog%20coats%20index.htm
I will post a photo of my dog coats here in the next couple of days.
Since dogs tend to get arthritus in their back legs first I am hoping these will help. Also one of my dogs, Ron, hates going out in the rain so this will hopefully help. Both my dogs seem to like them.
Anyway back to my top.
I made the piping as detailed in a my previous post. Then I cut out my quilted black fabric. I changed the pattern slightly and put the centre front and centre back pieces on a fold because I didn't want a seam there.
I then sewed the sleeves on using my overlocker or serger. This was a big mistake! It is really difficult to keep the piping in the correct place whilst serging. Even though I had sewn the piping to one side using a regular sewing machine then serged the other side onto it I had great problems getting this to work. Some of the piping I actually serged over.
As it turned out where I serged over the piping on one side I ended up cutting the overlocked stitches and re-sewing using a regular sewing machine to fix it. You can just about see it in the above picture.
Some piping I didn't get close enough to so this I also sewed with my sewing machine to bodge it so ity looks ok.
The next picture shows where I got a wrinkly finish on some of it:
Finally the easy bit was adding the collar:
As it turned out it looks good and I am very happy with it because it is a lovely warm top. I have yet to find out if it will survive for long though after I had to fix it!
I have learned from this project though and if I make this again I will do it differently. But then I am learning to sew here and isn't that the reason why I am writing this blog and doing this project?
Thanks for reading
Bracken
Subscribe to:
Posts (Atom)