Wednesday 21 October 2015

Twin needle progress

Follow my blog with Bloglovin


I have always intended to use a twin needle at some point. When I bought my new machine I was well aware my Brother PX100 which I have owned for around 15 years had the option to do this but until I saw this link which I found wonderful for aleviating my serious fear of twin needles I never got round to trying this.

A Stitching Odyssey: How to use your twin needle

Well I can only say I never realised how easy it is. I also looked at So sew easy

http://so-sew-easy.com/how-to-use-a-twin-needle/

where there is a video showing how to do this. I am now happy to say I can use a twin needle so on with the next project.


I really just practiced with a scrap of fabric from my next project where I am hoping to use this technique. Anyway I am very pleased with the result and can only thank the world of sewing blogs for helping me to have the confidence to try this out.

Thanks for reading and hope to see you again soon..............
Bracken


Saturday 17 October 2015

3: Lekala pattern for Sport trousers

I actually cut these out last winter but due to endless DIY I never got round to sewing them up. Well it has been cold the last few days in the UK so I decided to have a go. I did them entirely using my serger except for a bit of finishing hand stitching on the fold back cuffs. They are made from red sweatshirting with a fleece back and plain knitted front. They have two very deep pockets which are brilliant. Usually I find womens clothing has rubish small pockets but these are great.

The instructions are very vague but I made it through them. I did reinforce the front shaped bit with iron on interfacing. Turn back cuffs are doubled and sewn on the bottom. The pattern is from here:
http://www.lekala.co/catalog/women/pants/5277

It seems you now have to pay for this but I got it for free a year ago. They still do lots of free patterns though so worth checking out. Its the first Lekala pattern I have used and I am quite happy with the results despite knowing the trousers are far from perfect. Thats my lack of expertise though and not due to teh pattern. Still I have learned that I cannot make a pair of trousers entirely using a serger. Or at least not just yet. Maybe when I have a bit more practice.


To be honest if I make another version which is likely since I love them I will NOT be making them entirely with my serger because its hard. I think much better to just do the inside seams and then to use a twin needle or even a stretch zigzig stitch or some other stretch stich to make these. Mind you I broke a needle on my serger and had to learn to thread and re-thread so it was all part of my learning curve so not a wasted effort. Also I have yet to work out how to use a twin needle. That is my next project since serging alone was very difficult for this. I know you can trun off the cutter bit but I did not do this so I ended up with uneven seams and having to redo the cuffs several times which made them shorter because I cut them off first time by accident! That did not matter since I found the pattern is quite generous in all directions. Being someone who wears their clothes loser rather than tighter this suited me but if I make a very fitted garment using Lekala I will make sure to do a muslin first I think. I hand sewed the sides of the cuffs to get a decent finish else would have had the serged edge showing and a gap where the cuffs are meant to join with a slit opening. They look great now and I really enjoyed wearing them.
My dog is Reggie. He was enjoying a walk on the Ridgeway at Weylands Smithy in Wiltshire.
Thanks for reading and see you again soon

Bracken

2: Remodelled fairy/halloween dress part 1

I found this dress in a thrift/charity shop in Rugby, UK. It was pretty dirty but only cost me £5 so was a bargain. I washed it regardless of it saying dry clean only and it came out perfect. The original dress is really lovely but not something I could ever have the occasion to wear and I bought it to chop it up and re-fashion into a fairy dress to wear for next years festivals. 


Please excuse the half finished floor! You get the idea with this dress. Looks like either a Bridesmaid dress or a ball gown. I am not too sure which but for £5.00 it is I think a bargain. Perfect for a play with anyway!

However Halloween is looming so I decided to start the remodelling into a fairy dress now rather than later. After all it can always do for next years festivals anyway. I actually started this one morning before rushing out to work so it has taken me a while and quite a lot of thought to decide how to do this.


First of all I hacked the bottom off around 6 inches below the waistline. The waistline is lower one side than the other and decorated with a fabric flower that matches the dress material. I added small bits of fabric cut from the hem of the original dress to the flower to give it "tendrils" - see flower close-up lower down.


Excuse my messy living room please. I really must tidy up before taking photos!


My original intention was to wear this now short dress over leggings. I gave it a zigzag raggetty hem. My inspiration is from these dresses saved to "Sewing Inspiration" on my Pinterest page:


WD Archive .83 by wearydrearies.deviantart.com on @deviantART:


I am not too sure what I will do as yet. I may wash the dress again to make the edges fray a bit. Though that may then mean it just falls apart so probably I should wear it first a few times and see how I feel about it. 

 
Anyway, having hacked my dress I then decided it would be better longer. Also the back seems a bit shorter than the front when worn as you can see above.  

At this point I decided I had made a terrible mistake so I added the chiffon layer back onto the dress. I am now aiming for something more like this dress from Pinterest originally found on Etsy:  
At this point I attempted to do some designs.
As you can see I am not really very good at fashion drawings! You get the idea tho! I reckon I eventually need to make a sort of over-shirt or under-shirt. Similar to a dirndl blouse to wear with this dress since although it is lovely with a corset top it will be far easier to carry off during the daytime with a top under or over the corset. Also the UK is often pretty cold and I do actually want to wear this at some point possibly for Halloween which is often very rainy and cold. 
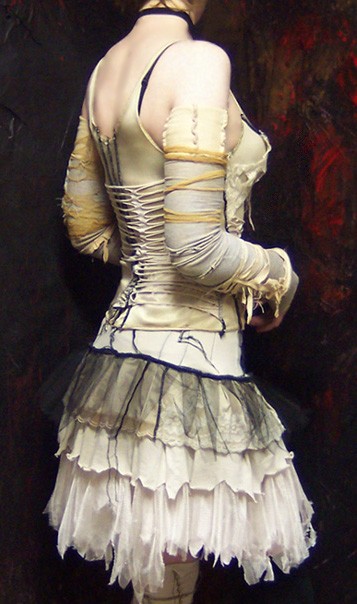
So then I set about making the skirt longer.


 The original dress had three layers of fabric. A chiffon layer, a satin under skirt and a lining so I decided to re-attach them but make them different lengths. First I attached the chiffon on its own just to see if it would look ok. Instead of just re-attaching I changed where it is joined because it has a longer bodice on one side than the other the original dress has a shaped lop-sided skirt. If re-attached with the short bit at centre front the seams will not quite meet but I do not care because by the time I have added other layers and chopped it zigzag fashion you will hopefully not see the miss-matched side and front seams so I now have a high low hemine. It seems a bit more fairy tale like this.


I also cut a new layer from some navy blue mesh. It is the kind of mesh you can use for lining jackets and I have loads of it in my fabric stash so it was time to play with some of it. I am thinking I can make a hoody maybe with a pixie shaped hood similar to the one in the last Pinterest inspiration picture above. Also when worn over a T-shirt as in my picture of the shorter version above it gave the dress an added very wearable dimension the bustier top would not give. And will be far warmer on Halloween in England!


I have lots of the navy blue mesh so whatever top I do eventually make will be made from that as well. 

 
I cut two pieces of mesh roughly the same size and shape as the original skirt bits and added a zigzag chopped hem to them. One piece is intentionally longer than the other with a view that the long bit is for the back of the skirt. I originally intended to join them into a proper skirt but then decided maybe just to overlap the pieces and sew them to the bodice because I am after a raggetty look for this dress after all. 
The original skirt was lined satin. To add onto the length of my dress, I had to cut off the hem of the lining pieces in order to separate them, and this left me with some thin bits of fabric strips which I tied around the flower. They look like tendrils.

 
Close-up of flower with my added "tendrils" of raggetty fabric strips cut from the double layer of dress skirt hem. Probably I will need to use a few stitches eventually to secure them in position but right now I am still not too sure exactly what I am doing to this dress since it seems to be evolving.

The satin layer also got a zigzag hem. After cutting the hem off the two bits of fabric became separate so I hacked about 6 inches off the satin layer but decided to leave the lining in tact for now.


Because I have a few days left till Halloween I have yet to decide my final version of this dress.

I now have a chiffon layer with intact hem, which I have removed again from the dress, a mesh layer and a satin layer. I also still have an unchopped bottom layer made from lining fabric if I decide to use it.

 After trying on the dress with the shorter hem above I am now deciding whether or now to add a permanent long skirt onto the underside of the chopped zigzag hem of the short dress or should I just make a separate petticoat which means I can keep my options open as to wearability and have a short dress as above but with a long underskirt to be worn as and when?

Thanks for visiting and come back soon when I will have another post on the final version of this dress..........
Bracken


Player with my serger - learning to use my Janome 8002DX.

In order to attempt my project which is to make 100 garments I need to first do several things.

The first is to learn to use my new overlocker or serger. To be honest I am unsure what is the difference between an overlocker or a serger if there is any difference. Maybe its just down to your location in the world as to what it is known as. Or is there a difference?
Well mine is a Janome 8002DX.


I started just finding scraps of fabric and overlocking the edges.  I had some left over scraps of upholstery fabrics so decided to attempt to make them into something. The first were two tea towels. For these first I made a hanging loop since I love Ikea towels due to them having an extra loop which makes hanging them up easy. I serged the selvedge edge for this to make a very basic strip of fabric and then attached this to an edge of the bigger rectangle of curtain fabric. Hopefully you can see from the following photo:


I also used several bits of velvet type of offcuts to make place mats since we need some to protect the table:


This is a very small project but I really feel like I achieved something here.
Or I did until my lovely man said the curtain fabric was probably Scotchguarded so would not work a a tea towel!


Wednesday 14 October 2015

In the beginning.........My aim is to make One Hundred garments

In the beggining I started to collect sewing and knitting patterns. Over the past 3-4 years I have downloaded over 3000 sewing patterns from free online sources. I also have a current subscription to Burda magazine which has now been running for over a year and have even bought some older second hand burda magazines. At one point I ventured into Prima but found there are very few things worth making in Prima and really its a "womens " magazine rather than a sewing magazine although does come with a free pattern each issue. I have so far made one pattern from the free resources at burdastyle.com which you can find here http://www.burdastyle.com/projects/rainbow-festival-dress-based-on-free-pattern-so-very-blue Hippy3_large

and one pattern I made myself or sort of bodged but it works and I love these cullottes here: http://www.burdastyle.com/projects/circular-shorts-or-cullottes

 Brax_shorts_front_listing


I was really inspired to begin blogging my sewing attempts because of these circular shorts because I found them on Pinterest where other people had thought them worthy of saving them! Anyway, now I also have a huge stash of fabric so am raring to go and make stuff. My aim is to make One Hundred garments and probably a few other things as well. I have absolutly no idea how long it is going to take me to make a hundred items of clothing but starting this week I should have a table to sew on and I am intending to begin as soon as possible. Right now I have the sewing space but no table just a floor so I am waiting and planning and getting fabric out and deciding what to do with it all. If you do stop by thank you for reading this blog and I hope you drop back in sometime soon

1: Boxy Orange top

I was originally at this address:https://brackencrafts.wordpress.com/ but I simply could not get to grips with Wordpress. I am sure its a great blogging site but right now I do not really want to spend the time learning how to use it so have started again here.

I want to SEW SEW SEW!!!

I have had a blog before with Blogger and although things have changed quite a bit since then I suspect I am going to find it pretty similar to use to what it was a few years ago. Hopefully that means I can spend more time actually blogging rather than spending ages and ages learning what to do to get a blog post up at all. Sorry Wordpress but I am simply just too busy to learn to use you right now. Maybe later this will change though.


1= boxy orange top

The floor is now complete. I blogged about the floor and how it was impossible to start my "Make 100 garments" project till it was done. Well I did not have a room in which to sew then. Now I do. I have a table to work on and my machines are out the boxes and I have started two projects. The first is a boxy orange top made from a remnant I picked up in Ikea in their bargain basement section. I think probably it was cut off one of their display curtains or sheets. I think it is a cotton polyester mix but I am not sure.


It has almost a rayon type of feel to it and is a lightweight fabric with some shimmer. This project was pretty quick and intended just to get me into sewing again. Really it has been sometime since I did any serious sewing.


This top is also made from a very cheap remnant so it did not really matter if it went wrong! I should have taken more photos but stupidly did not think to do so. I will get better at blogging I expect as time goes by. Anyway: The pattern is based on this Burda style pattern: http://www.burdastyle.com/pattern_store/patterns/lace-floral-top-052013


130_large

I followed the directions for the Burda Style pattern except that my version is only 50cm long after hemming due to lack of fabric. Possibly a bit short for me but OK over a vest or a slip! I only used one layer of fabric, not two like the burda version, which I then edged with lace. The lace is doubled over to bind the neck since it stuck up kind of funny when it was a single layer so I sewed it over like a binding. The sleeves are cut from rectangles and measured:

 IMG_0357[1]

Please excuse my sketch. The dimensions are correct and you need to cut two sleeve pieces, both on the fold of the fabric.The 25cm long edge when opened out is 50cm and thats the bit you join onto the shoulders of the top. I sewed the side seam of the top and the sleeve seams together. I could have tapered the sleeves in slightly more since they are quite wide but I am happy with this top as a first project to get me going and the orange fabric is very cheery on a grey rainy day such as today is in the UK. The lace was from my stash and is a stretch lace like you would use for lingerie and to be honest it may well have been better to use a non-stretch lace. I think it was from Weston Fabrics off Ebay. I sewed one row of lace on the neck and sleeves with the neck being used as a binding and two rows of lace around the bottom edge. However, it does give the bottom edge a kind of gathered effect which I do like although it was not originally planned that way. The lace was available and I did not want to spend much on this project. I did not serge or zigzag the inside seams which is probably a mistake since the fabric does fray. Anyway I am reasonably happy with it. I have worn it a couple of times now. It looks especially good with jeans. Considering it cost virtually nothing and was very quick and easy to make I consider it a success. If I made it again I think I would make it slightly longer but I only had a small remnant of fabric so that was not possible. I suppose I could have added a bit on the bottom like a double hem rather than add sleeves. It is my first real project in ages and my first garment of 100 garments so at least I have begun my sewing journey at last.


Thank you for visiting and I hope you come back soon.

Bracken