Monday 31 January 2022

Hair Wear

Over the past few months I have made lots of stretch velvet clothing as loungewear. For example my various pairs of stretch velvet joggers, dresses, tops and leggings and my glittery sweatshirt dress in my last 10 or so blog posts. As you can guess this has produced lots of offcuts. Some are still useable for other things like colour blocking in tops - which I have yet to explore - but some are very narrow like the edges of the selvedges and I decided to make lots of new hair wear. 


Is that a term? Hair wear? 

Well maybe I just invented something. Somehow I doubt it, but who knows?

So 
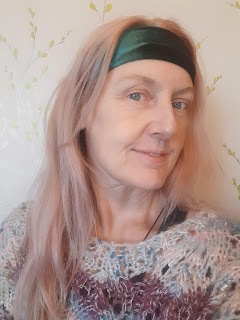
I have been making loads of hair bands. I made one in green velvet a year back now from the Rebecca Page Hair band pattern and its the very first version ever to fit me and actually look like a store bought hair band.  I never actually blogged about it then, but was more interested in my gloves and jumper but its been a great success and worn loads. I search very hard when I lose this in my wardrobe because I find I really rely on this when working hard and my hair is annoying me at the PC, so I decided its time I get round to taking time out for some lighter (practical!) sewing and make more of these but in different thicknesses or widths is probably the correct word.


I still used the basic band though from the RP pattern, but RP has 3 versions including a twisted one and one with a bow so its worth experimenting in the future maybe. For now these are perfect for me. I can wear all of these whe in work meetings without being too OTT. I did make several different widths - mainly to fit the available fabric pieces and with more vairety than the RP band pattern shows but its an easy adjust and takes zero skill to change the width really. And having this pattern makes making hair bands so very easy. I have stacks of old hair bands made from pieces of nice fabric thats just tied in a  knot and I do really like some of these so they are not being chucked out any time soon, but these sewn ones are like real RTW hairbands - as in finished and I could even sell these. Not that I want to sell them. I intend to wear them for the next year or so. 

I actually got an email from a blogger recently about making hair bands but the RP ones unlike most I have found online are made so that all you have to hand sew is a tiny hole where you turn them. You sew the long side then turn back on itself and sew most of the hole - so you sew the two sides of the tube with a machine / overlocker and you get this really neat hairband. Its not just sewn along the short side and the rough endes hopefully not seen. There are NO rough edges in sight. The only bad bit is I am so rubbish at neatly hand sewing them up!

This is a typical messy hand sewn bit. Still better than having raw edges tho!

You actually sew the join with the machine with the tube tucked inside itself and just hand sew about a cm or so- so its possible to pull it back to the right side - and depending on how good you get at making these the hole seems to get smaller the more I make - and more practice I get making them.

Eventually this pile will probably get lost into my wardrobe or the airing cupboard but for now I have all these:

I am happy! 
Its the sort of collection I used to buy cheap in January sales but these cost me a few hours over a few weeks to make and no money at all! They are totally made from scraps and really could be made from old worn out clothing as well. Personally I still have a large amount of stashed scraps to get used up.

Burgundy velvet head band - matches my dress and trousers

That dress has been altered twice since the original posts but more on that later maybe.

Then there is my slightly narrower green hair band. This is the same velvet as the wider band above and is because after a whole year of wear this has been well used I decided to make a second narrower version. Narrower is easier to wear and I find the first one is mostly worn folded to make it narrower so now I have a simple narrow green band as well.
Its still quite wide unless you compare with the original one:


As you can see there is actually a lot of difference in the width and that changes how it can be worn.
Blue and red tartan - currently making a dress from this fabric which has yet to be hemmed.

I love this lilac colour which is the same as my "Abba" tracksuit.


I need to make another in lilac I think. Its a colour I wear a lot at the moment.
Grey glittery sweatshirt fabric - does contain lycra so should work well I thik and is the only one that is not velvet! If made from bits left over from hoody grey glittery my dress and again might make another of these. This is the first one I made ( this year) and caused the sudden hair band frenzy!
I am not good at selfies!

Glittery black velvet left over from my trousers I made for the Christmas holiday

I particularly like the red velvet one which I actually found needed to be smaller than the others possibly because its more stretchy material but they are all good. The other one I keep wearing is the grey glitter sweatshirt fabric version. That needed to be bigger due to the fabric being a bit less stretchy but it still works. Although here the red looks very similar to the aubergine there is quite a difference in colour in real life.

Anyway, the RP pattern is really good if you wanted to make these but really not needed. The secret is to sew a tube then turn it inside itself and sew as far round the two ends as you can, then turn right side out and hand sew up the hole you pulled it through. Without the RP pattern I never realised thats how its done but its so easy once you know how.

I also made another scrunchie but this time just the one. 


I still have lots of these sewn into tubes ready for the elastic from the last time I made this kind of thing so the scrunchie was really fast and easy  just needing to be finished really. I can make more when I need them. In fact I should probably get round to finishing the pile I have stored with my sewing stuff. Having half made hair wear though is very useful like when you eg. need a scruchie in the next few minutes. I even wore one for a couple of days without sewing it together and just with the elastic holding it together. It works for the short term if you are busy and need one though.

This project was a nice change from the more difficult sewing I usually do I have to say. I feel like I got loads for the time I spent sewing. At least my original single hairband is now lots - in all colours. 

And I actually got rid of lots of scraps from my stash. One thing though about these hairbands is it kind of proves that it really IS worth keeping all those selvedges and small offcuts after all, despite what other people will say to you about clutter. 
Ha!
Have a great weekend and thanks so much for popping by,
Bracken

Tuesday 25 January 2022

Rebecca Page Sweater Cape with added Hoody Cowl neck hack.


I have had the Sweater Cape pattern since it was released but never till now had the right fabric to make it. Mind you this is possibly also not the ideal fabric but this does work.

The way you sew this up is very weird. The sleeves kind of go into the shoulder seams. Usually I do not need the RP directions but I used them this time because its such a puzzle. BUT if you read the instructions this is very easy to make and goes together really well. I find all RP patterns match up properly though, unlike a lot of the big 4, which I have found seams can be out by several cm. Not so with RP.

Changes to the RP pattern: 

I swapped the collar for a hood.The hood is from the Men's hoody cowl sweatshirt which I made recently for Mick. He is obsessed with that and seeks it out even from the dirty washing pile! Nasty! But does show how much he is into that one. I am making a second one for him. Its the first thing I have ever made that he prefers over RTW  logo clothing. He wears it with some pretty expensive sportswear. - I do feel my sewing side being flattered with that!

Anyway because he is so OTT about the hood on his top I decided to add it to this instead of the collar its meant to have. I needed to do a couple of tucks in the back neck to make the hood fit. I used a XS for the hood and XS for the sweater cape but the sizing is not actually the same if you read it for eg hips, waist etc. 

I did not this time add a pull cord to the hood so its less adjustable than Mick's. One to remember next time as well. Though I could probably adjust the hood to add one.

Besides swapping the hood for the collar, I added the cuffs pattern piece to the sleeve pattern piece with the idea it does not need a cuff then, so lengthening the sleeve - keep it simple since its fur etc. 

However, I now feel the sleeve is still despite the addition of the cuff to its length, a bit short, so I am considering adding a cuff onto that. I do like my sleeves extra long and should have considered that before making but for some reason I did not. I might just find some ribbing though rather than add a fur cuff. Not sure yet, but if I am not wearing gloves with this it needs longer sleeves. Normally I would have measured the sleeves against an existing top but in this case the weird shape of the structure meant that was impossible. I would also prefer a slightly wider sleeve next time I make this, so I can wear a sweatshirt or even a long sleeved top under this. As it is no I can't. But; for the price of the fabric, I could not make a cheaper wearable muslin so thats all ok.

And of course its lined!

I decided I need to line it with a second layer of fabric to make the very cheap ( £4 a metre in a sale) fur warmer and to give a nice inside because the fur has a knitted shiny backing. I think its the sort of fur usually made into scarves or cushions. I though have loads of it, in 3 colours, so will be experimenting further with what I can make from this, 

I used scuba for the lining, which has a striped design. For some reason this scuba fabric, which I expected to be very useable when I bought it, has remained unused in the stash  for nearly 2 years so its fair game as a lining for this. Its not a loose lining. Instead I just overlocked all the bits at once so the lining is sewn at the same time as the fur. Its successful at making this a fair bit warmer though.

You can see where the sleeve is joined along the shoulder seam here. I had no one to help today so its impossible to hold out both sleeves but just imagine a mirror image.

And you get a peak of the blue fur I am using next in the background. Along with a messy work area but thats me when crafting!


Despite its made from fur, this top is better suited to early spring rather than January when these photos are being taken. I do not see that its very likely I am wearing it until probably March because you need a coat over it and the shape this is precludes that. Or at least its not comfortable to wear a coat over it anyway. Back in the early 2000's I once wore a poncho under a coat. It feels like that. Kind of bulky and uncomfortable so best left for a couple of months time when it should really come into its own.

You cannot wear it on its own as a coat due to the sleeves being too narrow so its more like a sweatshirt really and its too cold right now to wear that alone when out and about - at least most days. Today its 2 DegC so pretty cold. Despite all this I love it and am happy to have got round to making this. And of course I have a slight head start in that case on my early spring wardrobe since this is definitely what I think you would call a transitioning piece.


Take care and see you soon

Bracken

Monday 24 January 2022

Sockalong update -Mosaic socks week 2 KAL

I mentioned last week my problems with knitting the mosaic socks which is the sockalong pattern for 2022 from Winwick Mum. You do not have to do the new pattern and perhaps I would have made better progress and much less mistakes had I done a different pattern. 


Sock knitting is  a new thing for me and I do not find it very easy. Its Ok since there are very good instructions but I would say the current pattern is certainly challenging me.

I believe - well pretty certain really I have completely cocked up the repeat mosaic pattern.

Now if I am honest its due to me being apparently unable to read properly!

These are my current projects - or two of them. The orange hat is the Isolation hat from Ravelry that I started just before Christmas. Its much harder than I expected and has been ripped back 9 times so far! More on that one later. I am also nearing the end of a jumper for my other half thats not pictured here because it does not fit into my knitting bag.
I had a few colour choice issues which are detailed in last week's post so I will not repeat them here. But thats not the only problem. I realised half way through the second repeat that I was meant to be knitting each pattern row twice!

 Well no wonder its hard to see the contrast!

Sock with heel flap completed

I am half way through the second pattern repeat and realise this mistake.  So half way through my second repeat, I sorted that bit out and do each row twice as I should ahve done. But then also I have more than once got completely confused as to where I was in the pattern repeats as well and I obviously got where I thought I was meant to be wrong because my socks do not look like others on the internet! Being part of a KAL does show how other people do things and this is incorrect.

Its still quite pretty though and, I feel, surprisingly well knitted.

Well I could undo it - rip it back or frog it etc but:

1) it does not look so bad, 

2) I have no problem with slightly ( or majorly?) not quite identical socks - after all I usually knit fairisle jumpers with odd sleeves on purpose and for around 30 years its been my trademark as far as friends who know me are concerned to do that, 

3) I am not so sure frogging this will mean when I reknit it it will follow the pattern anyway!

 Well no I am not unpicking because its not so bad and I have written notes on the pattern so I should hopefully manage to make a second identical sock with the same (or probably not the same but similar) mistakes so they (kind of) match. Thats the aim anyway. That will also mean I do not need to unpick and begin again.


So having realised this cock up has taken place I have decided to continue, finish the sock and knit a second one as near perfect as I can.

 Yes I am so imperfect!

But the pattern is now starting to look more like other people's so I am much happier now. I also at around the same time I sorted out my pattern repeats ( or thought I had) I decided to move up to a slightly larger needle. This is because I think the fabric is going to felt up if I carry on with the 2mm. I am now using a 2.25mm. I will need to do the cuff in the smaller needle next sock as well so that matches too. I am thinking maybe I should ordinarily go down a couple of needle sizes when starting socks and then go back up for the main body? Not sure yet but thats a possibility. I will decide on my next pair. So now I am trying very hard to do the pattern correctly for the rest of the foot of this sock. This time I am using the chart rather than written instructions but so far I have managed to swap the pattern colours round half way down anyway so not really achieving much improvement this way either. 

So I think this will end up being "inspired by" the Winwick Mum Mosaic pattern rather than actually looking like its meant to.

Also I decided to print the pattern rather than rely on the PC version. I think thats actually why I made the mistake of doing half the number of rows for each colour repeat - I was trying to remember etc. Having to keep going to check what comes next in a different room ( because the PC is in a different room to my comfy space) to where I knit is not ideal. Not the best way to knit. With a pattern in hand its slightly easier.  Had a printer problem recently though so I am avoiding printing because I seem to spend hours cancelling the print and then reprinting but it did eventually work and I have a hard copy of the pattern to sit down with. 

Time will tell if it makes the slightest bit of difference of course!

This is how my sock is looking at the moment:

I am quite pleased with it despite everything not being quite as it should be pattern wise.

And I do not like circular needles at all! 

The only advantage for me is I am less likely to drop the stitches which being so small are hard to find properly to pick back up. I prefer to knit on 4 or 5 pins and on around a 5.5mm as well! So I swapped back to the 5 pins and wow has it grown since I did that. I might even catch up the other KAL participants now!

More on this KAL next week

Bracken

Wednesday 19 January 2022

Winwick Mun 2022 Sockalong - Mosaic socks


Just a quick post to show you my progress ( or lack of) taking part in the 2022 Winwick Mum Sockalong.

You may remember my previous two pairs of hand knit socks which were made using the basic sock along - also via Winwick Mum. 

However I followed that  sock along recently when in fact it occurred back in 2015. Theres more on my purple socks here 

https://brackencrafts.blogspot.com/2021/10/my-very-first-pair-of-knitted-socks.html


and green socks here. https://brackencrafts.blogspot.com/2021/12/green-socks-my-second-pair-of-hand.html

This time I am using the new ( and free) Mosaic socks pattern - by Winwick Mum. Again the idea is to use stashed yarns. I did have a look at proper sock yarn but its so expensive that unless I can afford quite a few balls I am better off trying to use my stashed yarns. The postage is as much as one ball of yarn! At some point I do need to buy some proper sock yarn but I need to be able to get about 6 balls to make it worth it. Or maybe visit an actual shop. Well for me thats such a novel idea and it has nothing to do with covid. I haven't been proper shopping for anything other than food since 2007! Also I still have about 20 balls of this ( bad buy!) lace weight kid mohair and the socks I already knitted from it are amazing.

I started these in pink and yellow with the yarn doubled (lace weight kid mohair as previously). But I had forgotten why I knitted the green in different shades - because its easier not to miss one of the threads when knitting! The green are silly and too thick though. I made holes in my fingers making them which meant I had to keep stopping to let my fingers heal. I should have knitted them as double knit or something!

I actually only need to knit the lace weight doubled to get the right thickness for sock yarn. So I decided having started in pink and yellow to change to pink/purple and yellow/green. Thats worked much better - though as you can see I left the original border in solid colours. But having completed one pattern repeat there is not enough contrast so I have now decided to go back to solid yellow but keep the pink/purple mix.

Once I get a bit further I will show you what it looks like. I am knitting so much slower than others doing this sockalong. Still never mind. So long as they get finished eventually. 

Oh and also this time I have actually invested in circular needles. I cannot knit on the recommended size so ended up buying 3mm, 2.5mm, 2.25mm, 2.75mm and 2mm. These are meant to be knitted on 2.5mm. To get the tension I am using 2.00mm and they are so small! Still I have a great set of small circular needles now!

More next week on these. They are kind of going on in the background whilst still sewing as usual.

Take care

Bracken

Updates - my aubergine dress


 Ah, so this dress has been annoying me so much. I actually bought some more of the fabric - which came from Ebay and they increased the price by nearly £2!

Anyway despite the price increase I still bought another metre of this because I am so unhappy with it every time I put it on. I just never wear this and always end up changing into something else. So thats not right is it?


Original neckline

Well its the hood and the neck you see. Just isn't right and also (which I am less bothered about) does not look like the original RTW dress I was copying. Most importantly it must FEEL right and it didnt!

So this is actually the third hood I have attempted - though the second version I never took photos of. It lasted about 4 days and then changed into this one. The second version is also too small hoody wise like the original version which is here: https://brackencrafts.blogspot.com/2021/10/velvet-hoody-dress-rtw-inspired.html

The first version is well described in the original post. Its a copy of a goth RTW dress I fancied but did not want to pay the extortionate price for. 

The second version I used the hood from the Newlook 6142 pattern. Thats actually what it is now but after using that pattern ( note that I squared off the top of the hood to get the witchy look) I again decided it just did not look right so I added the fur onto the edge. At this point my new metre of fabric had arrived but I never needed it so have that for something else. Unfortunately experience tells me that having just 1m is rubbish and very difficult to use and since I spent the last 3 months trying to eliminate 1m pieces of velvets from my stash this is actually not a good thing. Still these things do happen ( to me!).


As you can see MUCH MUCH bigger hood!
The fact the fur is the same colour is pure chance. It was reduced at Pound Fabrics - google it. Cheap and good fabric company - unlike my previous Pound-a-metre experiences this company has been ace and I would defo reccommend them. And if you sign up you get points and I managed after very few orders to actually get £3 off.  I never bothered to sign up for my first 2 orders but would suggest you do not make my mistake if you buy off them.
Anyway never mind that. The fur is left over from the RP sweater cape pattern. - more on that once I get to taking the photos so a bit of a spoiler here too:)

Never mind!This is finally something I am actually happy with, thanks to that small ofcut of fur fabric to make the hood larger.Its not the same as the RTW version. Personally I think its actually better though has taken a lot of reworking to get it to that point. But I am happy nw and have worn it twice over the Christmas holiday so thats my proof I like it. I finally got to wear this withut changing into something else. Success at last then.

Take care, keep warm - if in the north hemisphere, and have a lovely week

Bracken