This is a 1980s free pattern.

I cannot remember which magazine it came from but it was a fashion mag rather than a knitting mag. I knitted it first in 1986 when it first came out. I know what year despite there being no dates anywhere on my pattern because I was working at a kennels which I loved but I got paid very little and I only worked there a short while before getting a better paid job. Anyway I made it twice before. The last time was probably about 1989. Both times I made it in the right guage of yarn. This time however I have made it in the smallest size but in super chunky yarn which uses 10mm and 8mm needles. I bought this lovely yarn in various colours but could only find limited patterns for it and most of them were for scarves and infinity scarves. Well sorry to all the scarf enthusiasts out there, but I find scarf knitting very boring and always have. I have yet to actually finish a scarf. Jumpers or sweaters though I need so I find the incentive to get on with it and finish. Each yarn is a rainbow yarn that changes colour as you knit which gives the already multi coloured fairisle and textured stitches an extra something.
pattern here:
I am unsure how much of the pattern you will be able to see on screen
but I shall write this assuming you can decipher everything and if
necessary I will re-type the pattern later. If anyone needs the directions please just email me and I will type this out for you.
Unfortunately I liked this
design so much - its very easy but looks complicated - so years ago I
laminated it so it is very difficult to photograph and you simply cannot
scan it. I especially want this particular jumper too since I have only one hand knitted jumper which goes back to 2004 and all my others are machine knits. To be honest now I have embarked on my somewhat huge journey making garments I only want to wear hand-made. Not necessarily hand-made by me but hand-made all the same. And every other time I made this I loved it above just about every other jumper I had.

My colours: All yarns from Aldi and Wilko in the UK so very cheap yarn. All super chunky with suggested needle sizes of 9-10mm. However, it is also reasonable quality and washes ok going by previous experiments with it when I knitted some gloves a few years ago which wear washed and tumble dried quite a lot and are still going although definitely a bit worn now. I also knitted some baby clothes fro my friend's new born and they were washed loads and stood up to it so I think Aldi yarn is ok for the price and for this jumper.
Changes to the original pattern include doing just the textured slipped rib stitch for the sleeves and not the cable as shown. In fact I have never done it with the sleeve cable since it seems a bit strange to me in this pattern but could be nice if perhaps done with contasting cables so one half is one colour and the other half another making a twisted rope kind of look. If you know what I mean. Not sure that is very well explained so sorry about that if it does not make sense. The rib pattern is in blocks of 10 stitches so its pretty easy to work it to miss out the cable and just have a ribbed stitch.


The pattern uses 5 colours but I never have but I also miss out the cable on the sleeve.
You knit the centre front and back panels using the
following chart and 4
different colours although I have always used up odd balls and adapted
so I do not necessarily do the ribbing in the recomended colour if I am
running out of yarn.
I just adapt because this pattern is very flexible and will still look brilliant once finished.The rows up the side are numbered in ODD numbers 1-11 which is the number of repeats. You knit row 1 and purl row 2. Then knit all odd rows, purl all even rows.
I did the main body panels which are the fairisle bit in the recommended (for the yarn) using 10mm needles and they worked well. Not too loose or too tight so the best needles for this bit, but when I
came to do the side panels the knitting was just too lose using the
10mm so I sent for some 9mm and 8mm needles. In the end I used
the 8mm needles although maybe with hindsight no 7mm
needles might have been even better but I wanted to get on with this else I might have tested a swatch of
the smaller size. If you do this pattern it may be best to experiment a
bit.

I used normal chunky yarn for one of the contrasts. I
just used it doubled to give me the bulk. The recommended needles for this
were 5.5mm so when doubled it is OK with 8mm for side panels and works
well with 10mm for the fairisle.
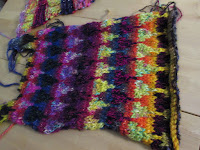
You knit the side panels seperately and then sew it together.
The sides and sleeves are in a textured rib stitch which is basically
an alternating slipped stich so pretty easy.
The original side panel I knitted in 10mm needles which came out too loose, I kept incase I needed the extra yarn. More of this later.

Finally you do the ribbing and the bottom and the neck edge. The pattern uses a cross over neck style which was really popular in the 1980s but personally I never liked this.Neckline: on both my previous versions I did an open neck with a collar. This time I am doing a normal crew neck.To do this instead of following the pattern I shaped as a similar crew neck pattern and cast off alternate rows until I got the correct number of stitches. Since the jumper was huge anyway I did not worry too much about how many stitches I ended up with. It would fit me anyway.
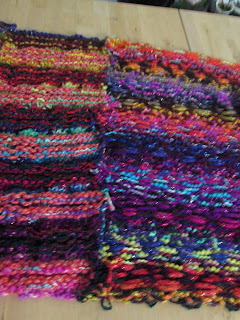
Sewing up the front and back panels: I found it easiest to use the many wool ends where I had cut off the different colours at the side to do the sewing.

To be honest I think sewing the thing up was the worst bit of this garment - all the seams to sew up. By using the short bits you also weave the in at the same time giving a neater finish.

Sewn up panels:

Neck: using 7mm needes I pick up all the way round and knit in a circle using double ribbing then I do one row of just purl so it will fold over nicely and then continue in the double rib until the neck lining is the same size as the outside of the ribbing. It makes like a self facing.

Then I just slip stitch it down. I did toy with the idea of picking up the inside neck stitches and casting off two stitches at once to avoid having to slip stitch ( no idea what this technique is called or if it even has a name) anyway the jumper was simply too heavy and I gave up doing this and just cast off using a size 10mm needle for the cast off row to allow for some stretch.

This is the reverse after I had joined in the ends and sewn up:

Hems of the jumper: for colour A I originally used two strands of a yarn meant for 5mm needles. The pattern says to do just one contrasting row on the cast on edge
rather than a row in but I decided to do this instead and I am happy
with it. Double rib is used for the
hem and sleeves with a cast on in the main ribbing cvolour then two rows of a
contrast and then back to the main colour again.

I decided I want the hem thicker since both times I have previously made this pattern the hem wore out first so this time I used three strands of the same yarn. This did mean I had to be careful when knitting not to drop one strand of yarn so it does not make it quick to do the hem. Also on both my previous versions (both made in the 1980s) I used a circular needle and knitted in the round for the hems. This time the jumper is just too heavy. So anyway I actually joined the bottom of the front and back only to
change my mind and just knit half of the bottom ribbing. I still had the
weight to contend with and the 3 strands of yarn, but not the huge
number of stitches. So: I knitted both front and back ribbing seperately
which does mean sewing them together but that is just like a conventional jumper so not the end of the world.

Both previous versions were in warm but light weight mohair and chunky yarns. This is super chunky and it has knitted up very heavy. Should be a very warm garment though. I have worn it once so far and was very hot in it. Havings aid that the UK has yet to have a proper winter and when/if it arrives this year I am now ready for it.
Because all the wools change colour there is a variation in every panel
which to start with was quite annoying but once you get into it I really
like the effect which is good because I do not really have time to
start this project again.

This jumper is really all a bit experimental - or hit and miss depending on how you think - but its come together very nicely. It is huge and cuddly and warm which is what I wanted. It has a bit of glitter which I also wanted. It is multicoloured due to the design and also the fact I am using magic colour-changing rainbow yarn for all my contrasts except for on the side panels where one contrast is a tweed. Still its a very multi-coloured looking garment and will be warm for winter and just what I want for Christmas. At work we have a christmas jumper day but I do not really like any of the commercial "picture" jumpers and if I was to wear one I would want to make it. I do not currently have time and this project has been going on for too long already so the sooner it is finished the better because it is taking precious making time from my sewing projects. Anyway, most of all I just needed a big thick winter jumper before it gets any colder.

And finally just to finish off: the side panel I made that was too loosely knitted will make a lovely cowl/ infinity scarf. I just have to weave in the ends and I think I will join everything together with a couple of buttons. So after all I will make scarf too. It will make a lovely addition to my jumper and in the end it would be a right pain to have to unpick all the rows of different coloured yarns to rescue them for another garment and I hate wasting things. More on this once I have finished it.
Thanks for reading and hope to see you again soon,
Bracken


