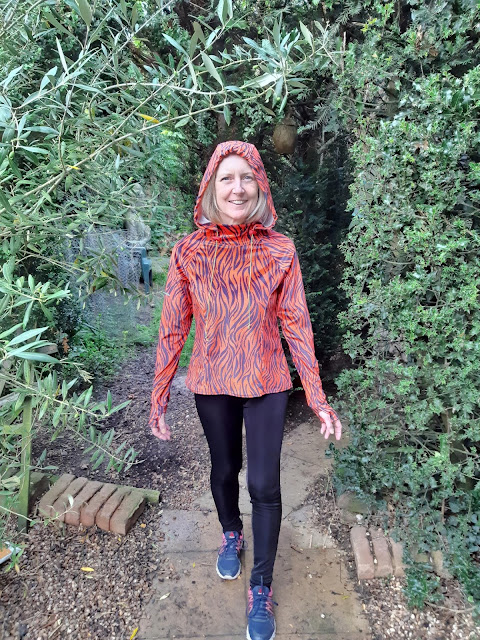
Friday 26 November 2021

Glitter jersey sweatshirt dress

This is the Peppermint Patterns jersey dress pattern which is free at the moment from their website though they do ask if you can give a donation to allow them to keep giving free patterns away. Its the first thing I have tried using Peppermint so interesting in that alone.
This is a brilliant slouchy comfy winter dress.
 
I added the hood from Burdastyle hoody that I made twice before as both a fleece and a sweatshirt. Because the neck is smaller than the hoody neck it wraps further round giving a really nice ( and a bit unexpected I must admit) high neck which is very, very warm and cozy and just what I need right now. 
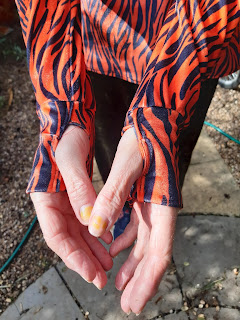
 
The Peppermint patterns dress has pockets which are optional. The thing about these is they are part of the main dress and cut as one piece not as extra bits you sew in. 
 
This has advantages and disadvantages.

Advantage: It gives a very neat finish to the inside of the garment and makes it really very easy to sew something with pockets if you have never made something with pockets before. In fact I have to say this is quite ingenious.
Disadvantages:

1) It takes a lot more fabric to make this than if the pockets were seperate and added to the side seams as usual.This fabric was expensive so it was not a good idea really to do it this way other than it is a new experience for me, which of course is always a good thing.

 2) The pockets do not want to stay inside. I need to keep my hands in them to get this to look right.


I also missed out the hem band round the bottom because I prefer a looser dress. Its meant to have a hem like a sweatshirt. 

However, despite the wasteage making pockets in this way, I am happy I tried this, and it would be easy to change other garments to incorporate these kind of pockets if you do like them. I think its worth trying this type of pocket out if you have not made something like this before. 

I used a french terry, glitter, sweatshirting. Sadly the glitter does not show on the photos and this is really very glittery. My previous glitter sweatshirting has nothing on this one believe me! Its lighter weight than my tracksuit and is a viscose french terry. I like it though and wish I had bought more. But it was expensive. Its from one of the online stores but to be honest I cannot remember which and seem to have lost the email. I bought it back in the spring. 

Maybe a different fabric would make for a better pocket? 

I have no idea, but I do not regret trying this, though the two other dresses I have cut out in the same pattern ( yet to be sewn) I have omitted the pockets simply because of the amount of fabric I have available to use. But then you have a choice of with or without pockets and of course there is really no reason why conventional pockets made from two extra pieces sewn to the side seams could not be used with this pattern if it fits better with the fabric you have available. I just wanted to try this to see how it worked out.

 
This dress is part of my "winter essentials loungewear wardrobe" I have started to sew. Normally I spend all winter thinking of warm clothing I need. That is whilst feeling cold.


I usually have the right fabric but I just take so long to actually get it together to trace, and then cut out, and sew, so several weeks ago I decided which patterns I am using and stuck them all together. Then I mass cut out velvet and sweatshirting which I intend to cozy up in this winter. Its all lounge wear type of stuff and because I am sticking with just a few patterns for this, so its a bit unadventurous, but will mean I get to lounge around in style ( hopefully!!!) and stay warm while I can then spend time tracing and making just a few more interesting things without being cold while I do this. 
 
If this works as a plan for making lots of weather appropriate clothing I will do this again each season. Its just an experiment right now. I will update you on how this works later - probably I reckon about another 2-3 weeks to sew all this up. Then I am free for the rest of winter to do what I want and make a small number of interesting projects instead of having to waste my weekends making basic stuff that I actually need, because that parts already been sorted.
 
So this is part of a long term sewing project that will take maybe two or three weeks to complete. So far I cut out 6 pairs of track pants in 3 styles - sewn but without waistbands. Two sweatshirts and 3 dresses - including this one. Also so far I have one pair of leggings and one pair of cycling shorts - because I found my tiger stripe ones very wearable. I think maybe these will just get used for zoom yoga till spring but still will be useful.


I just bought some more glitter sweatshirting from Fabrics for all (but its not as glittery as the stuf this dress is made from), as well to repeat my now pretty well worn grey tracksuit. Have to say its gone up by £20 since the last lot I ordered!  

I have actually almost worn that out though so really must make a new one. One of the best makes I have so far managed I think. I need to get round to cutting that one out next. I just hope the new fabric wears as well bearing in mind the huge price hike. 

Anyway with some luck by next week I can show you a couple more things made from this collection. 

Happy Friday (or Happy Fri-Yay)

Take care

Bracken

Friday 19 November 2021

Orange Velvet Tiger Hoody


I am getting much more confident with this top now I have made it several times. This is my fourth hoody and I also made on top with the collar version and no hood. This time I actually added the pullcord! Yay!
Its the last big item I am going to be able to make from the orange tiger striped velvet I got from Minerva. Now there are just small bits left. To be honest had this not been constructed from panels - its princess seamed - then I would not have managed to get this out of my 2.5m which I had in 2 seperate pieces.

The leggings were made as part of a capsule wardrobe I worked on a couple of years ago. The green velvet track pants are made using the Rebecca Page Cerena playsuit pattern.

The thumb cuffs are imperfect. I somehow managed to pucker the fabric on both cuffs. Pattern for the cuffs is from Melissa Feyr's "Make Your Own Active Wear" book not the cuffs in the pattern. I thik its a better design than having to hand sew the thumb seams. Though its not usual I muck this up and get puckers! Still imperfect or not they work.


I love the hood with the extra bit added in the front. I still always have to look up how to do the front neck and I am really not sure I did this right on any of my versions of this. Still it seems to work!

The pullcord and toggles are both from Ebay. I have some skull shaped cord end toggles coming but they have not yet arrived. I really want to add them on. I will update the post once I get them.  

Thanks for popping over

Bracken


Thursday 18 November 2021

Scandanavian jumper from a free Ravelry pattern

This is from a (free) Ravelry pattern that I have had my eyes on for a long time- as in years. The adult version is made from double knit though and I have chunky weight and very fluffy mohair type yarn. 

Anyway because I made this in mohair (type) this is mainly based on the childs version of the same jumper due to the number of stitches cast on. I used the Blue jumper I made a few weeks ago as a guide to how many stitches I was going to need to get this to work for me in mohair.

You can find the patterns here: 

Childs: https://www.ravelry.com/patterns/library/sloir-for-kids

Adult: https://www.ravelry.com/patterns/library/sloir

I say mohair type because I have no idea what the charcoal grey yarn I used for the main body actually is. I bought it from the same Ebay seller as sold me the pale grey tweedy variagated yarn used in the patterned yoke and that had a label on it from BEE BEE yarns which the internet told me is in Yorkshire. I think its some posh hand spun but really other than the very high quality and extreme fluffiness I do not know if both are the same brand or what the fibre content of either is. They look more like mohair than anything else but you cannot always trust the way things look.


Mixed in with this is vintage cream Patons Focus on Cotton which is a 30% mohair with cotton - because its what I had. Possibly really thats a shame because the Focus is not as good a yarn as the others but this is meant to be do-able in vintage yarns and on the cheap ( cos thats just what I do!) and thats what I had available. The child version does not have the cream stripe through the yoke that the adults does so I kind of merged the two patters here and copied the adult " look" with the child stitch count.

The black is left over from the skull hoody. I used less colours in total than the adult jumper though and used black where the original versions (adult and child) both used dark brown for some parts of the spores but I think it works fine like that.

So this really is the pattern for the child's sized version due to needing that right number of stitches I used for the adult Blue jumper - also in mohair. I could not think of a better way to convert the double knitting pattern to a chunky one so I can use the yarns I have collected. Anyway its worked out well. I used a 5.5mm for the ribbing and 6.5mm for the main part - the same as for the Blue jumper.

However the wrist pattern is from the adult jumper pattern because it was easy to convert the repeats to the sizing I was using and I thought would look more interesting - I just needed to increase 2 stitches after the ribbing to make this work - and other than that I followed the colours on the adult jumper so that I have white/ cream in the same sort of areas of the childs pattern as would have been on the adult version. The childs pattern is far more simple as in it uses less colours hence has no white in it so I kind of amalgumated the two sizes to make this. Its an acceptable chunky version I think. For a first attempt anyway 😀


The only regret I have is the row of dark ribbing at the top edge of the wrist. Thats a mistake. It should not be there, but by the time I decided that I had started the second sleeve so was not going to unravel all that knitting. Its not so bad, but next time I will go pale grey there. Assuming I make this one again that is. I love the final jumper but its not my normal look really - being neutrals.

Also this is a big change for me. I have never before in my entire life knittted something in neutral/ natural colours. Its just not my style but this animal spore print jumper is me! I really did not see this looking good in bright or even pastel colours though! So I deliberately sourced the yarns for this  ( all from Ebay and second hand but obviously not yet knitted into anything). 

I now have enough yarn left over from this to make at least one and maybe 2 other jumpers though. Thats the problem! I have to find a way to wear more subtle neutral colours in some other nice jumpers to use them up. For now the stash just grew quite a bit bigger while I decide how to use them up.

 Have to say I am over the moon with how this one worked out though! 

Ah the leggings! Almost forgot. I made them as well here:

https://brackencrafts.blogspot.com/2017/05/red-and-black-faux-leather-leggings.html

Enjoy your weekend and thanks from dropping by the blog

Bracken

Friday 12 November 2021

Tiger trimmed Tie Dyed mesh top

This is truly a stash busting project. I made the mesh top from some fabric that has been hanging around for a few years and I could not decide what to do with it. 

The tiger trim is Minerva fabric ( which matches my leggings and cycle shorts as well as my track pants/PJs - because I cannot decide what they are best used as!) but not too sure where I bought the mesh from.  I have another 3 pieces of it in different colours yet to find a use for. I love mesh tops though but wanted this one to be different and also better made than some of the ones I made before . I just need a change. Ages ago I copied the Frieda Petrenko top


Its just got bands added to the sleeve and neck edges and its a great finish for mesh. In this case though there is not a pattern. Its another self drafted "squares" top like my many versions of this kind of top. You can get directions here.https://brackencrafts.blogspot.com/2015/12/8-dark-navy-top-with-step-by-step.html

I made this one much longer - dress length because I want something big and baggy rather than figure hugging and maybe I can wear a short slip dress under this -  sadly no more orange tiger velvet to make a dress though I have many offcuts which I need to find a use for but I am thinking they will be more knicker sized than dress sized even if I mix with something else like black velvet. The sleeves are also tapered out at the wrists to make them baggy. Before I added the cuffs they had a kind of witchy mediaeval look but it was no good for real life hence the cuffs.

Also for this top I decided though to use a T shirt pattern (Butterick 5562) for the neck shaping here and then just added narrow offcuts of the left over bits from the recent leggings, cycle shorts, track pants and my ruched sleeved top to make this. 

And I love it though to be perfectly honest there is a mistake in this. You cannot tell from the pictures but in an effort to encourage anyone who might make a similar mistake: I wanted a selvedge for the hem edge rather than my usual overlocked look for this top and never thought about the fact the stretch will then go down not across the top widthways. Yes I got my selvedge edge but I should have been less lazy and hemmed it or just left it as a raw edge or overlocked edge like the rest of my tops. It still fits, being a large baggy top, but its not how it should be. 

The stretch is really best going from side to side accross  the top. Never mind. Next time I will make it with the right direction of stretch! I have other colours of this fabric in my stash and I like this enough to do something similar but with different edging ( since I| do not have that much more of the tiger fabric). Though this is my only piece of tie dyed mesh. The other pieces are plain colours.

I have worn it several times so the stretch issue is not actually a problem since its so wide anyway but if I had made a tight fitting top like my original navy self drafted top this would have been disastrous!

Well you can't win them all!

Thanks for popping by my blog

Bracken

Friday 5 November 2021

Tiger Statement Leggings


 I have had several emails recently from High Street stores going on about "statement leggings". Well to be honest they are really nothing new but I suppose they have to find ways to get us to buy new stuff somehow. I had already cut these out before getting any of the latest emails but I think probably they do fit into the "statement leggings" category. 

To me they are pure wonderful old fashioned classic punk rock!

This is a TNT pattern - yes I am being lazy again!! McCall's M6173. But then the reason its one of my TNT patterns is its so wearable.
And they turned out brilliantly I think. I originally cut the longest look with ruched ankles but being velvet worry they would be too bulky for my boots so I then cut a few cm off these meaning they are actually shorter than view B but longer than view A. I think for winter this will be better because it should avoid the cold ankle thing you get with leggings and trainers. Fabric is from Minerva the same as the previous several orange velvet tiger striped articles I made over the last few months - I do love this fabric!

I expect to wear these loads with my biker jacket as well as sweat tops. They are much easier to handle wearing than my track pants which seem to have become PJs. Never mind. I suspected they would. They do make lovely PJs.

And I love these. I should have just been brave and made these in the first place instead of the messing around trying to tone this fabric down with the many things I have made from it previously.

Have a great week and thanks for visiting

Bracken