Thursday, 25 February 2016

22: Plain black yoga pants made in a rush

It was Wednesday and I decided out the blue to book a Pilates class for Thursday lunchtime so the very next day.


Well I have lots of leggings but for some reason I decided I needed yoga pants.
Wednesday night it took me over an hour just to find the pattern I had downloaded at least a year ago and never used from here:
http://ifonlytheywouldnap.net/2015/03/06/free-yoga-pants-pattern/

Of course I had then to stick it together so that was probably another hour. Luckily it is not a huge pattern so did not take too long to stick it all together. Then find some fabric from my stash. Well my fabric stash is huge due to my having been obsessed with fabric for about a year before I had the space in which to set up my machine and do any sewing. My other half in fact finds it a constant nuisance because it is all stored in Ikea under bed storage bags which are piled up in the corner of one room. Anyway I have LOTS of fabric to play with which is great because in real life I do not always have the money to buy fabric when I need it so having a largish stash makes for easier creativity.

After much deliberation and re-discovering of my fabrics and lots of holding it against me in front of a mirror I decided on this lovely very silky four-way stretch fabric. Its from my favourite seller on Ebay - Weston Fabrics, and has a really good drape as well whilst still being light and stretchy. It has a slight crepe look to it so is not really your average sports fabric but will work I think. I expect probably most people will make a dress or top from this stuff but I have no "performance" fabric in my stash so went with this. Its a jet black too because I decided after exploring various colours I really do not want to stand out that much in my Pilates class so best to stay black and boring.

Well the pattern is a size medium but what is that? I find I can be anything from an XS to a large depending on the pattern and this is a freebie so who knows. Since this is my first making I stuck with the pattern as it is given so made a medium up. I sewed up using an overlocker (serger) and it went together perfectly. Every seam matched. I made the waistband about 1.5inches smaller since when I tried it on before attaching it it was a bit large widthwise rather than lengthwise. I also kept the waistband plain the same as the rest of the pants. If you look at the original pattern instructions  Jess's design has a patterned waistband to go with the a Blank Slate pattern jacket to make up into a track suit. I might have to consider buying the Blank Slate jacket myself since I read a really good tutorial from Mel the other week about making a hood to fit any jacket and I quite fancy making a hoody.  http://mellysews.com/2016/01/add-hood-jacket.html

When it came to hemming these I had had enough and needed to relax a bit before going to bed. After all I am meant to be wearing these tomorrow for sport so cannot be too knackered before I go to sleep because I am sure I am currently very unfit and staying up very late to finish these is really not going to help me. So instead of doing a proper hem I just overlocked it and left it at that. I will do the proper hem next time I get the twin needle machine out. They will be fine for my class tomorrow.


The sizing on me is probably a bit big for yoga pants since I think they are meant to be tight but having said that these are a really good fit. I could wear these to work! I love the waistband but wonder how they will preform in Pilates. I will find out later today. Also today it is so cold in the UK.  I am wearing them to work before I go to Pilates and I am wearing leggings underneath. I probably will have to take off one layer or the other for the actual class so will see how I get on with them first.

Well in the end I wore the leggings for the Pilates class because I find the yoga pants keep falling down ad I did not want to spend the class constantly hitching them up.

My conclusion: If I want to wear these without leggings underneath ( which help to keep them up!) I need to sew some elastic next to the waistband so it is hidden when it folds over. That will stop them falling down. Maybe I should try some transparent elastic.

I read a great tutorial on this from Maria Denmark not so long ago:
http://www.mariadenmark.com/2016/01/invisible-elastic-in-the-neckline/?utm_source=MariaDenmark+Sewing+Newsletter&utm_campaign=2e433c5c94-How_clear_elastic_1_17_2016&utm_medium=email&utm_term=0_08112198fa-2e433c5c94-91195185


In the end a week later I have I sewed 1 inch elastic to the inside waistband with a zigzag stitch. I have lots of 1 inch elastic since I bought a whole roll of it from ebay so I decided since I am unsure if this is even going to work to use what I already have.


And it worked really well and I have worn them several times since. Heres how it looks:


So thats fixed the problem and to be honest I would definitely make these again either in the same size but with the added elastic or alternatively make them in a slightly smaller size. Jess gives directions on how to do this on her blog by drawing round some trousers you already own.
http://ifonlytheywouldnap.net/2015/03/06/free-yoga-pants-pattern/

Having said that this will work best if you already have some yoga pants but I do not so I may just try slashing the original pattern down the centre front and back of each piece and take in by about half an inch so around 2 inches in total. I think then they will be perfect and much tighter fitting to wear as yoga pants.


In the end though if you want slightly flared yoga type trousers this is a really nice pattern  and its FREE and I would recommend this pattern. In all this project from putting together the pattern to finishing ( without a proper hem) took me about 3 hours.I did do a twin needle stitched hem when I had a chance a week later so they are actually finished now and I still love them.

Thanks for reading and hope to see you back here soon,
Bracken

Wednesday, 24 February 2016

21: Burdastyle 01/2016 112 track pants or lounge pants

I decided when the January magazine arrived that I wanted to make these:


They are 01/2016 style 112. They are lined so very warm and cozy.

I had this four-way stretch crushed velvet which I had bought and loved and thought would be good to make these in. With Hindsight maybe velvet was not my best choice. I wore them to work yesterday and decided perhaps they are best left for lounging around at home at the weekend. Despite this I do love them. Probably if I make them again it will be in normal cotton jersey not velvet though since they remind me of the velour tracksuits that were around about 10 years ago. The style is much looser than the velour tracksuits of ten years ago though.

Well I made them up as directed in the Burda magazine and I actually fall between a 36 and 38 in the Burda sizes. I tend usually to make the larger size but these looked big on the picture so I went down a size. The lining I made from a cheaper  stretch white fabric which could be polyester. I made them mostly on my overlocker but did the basting round the waist to keep the lining joined to the outer, in order to attach the waistband which you need to stretch to get it to fit, by normal sewing machine. I also used the normal sewing machine to stitch two rows on either side of the waistband side seams so I could do the gathering as directed in the Burda magazine.


Both sides of the waistband are gathered and then you stitch stay-tape on to secure the gathers. Then I used a zigzag to attach the 1 inch elastic to the inside stitching line on the waistband and put them on only to find they were absolutely huge. They were far too big to simply take in without destroying the shape. At this point I should have taken a photo to show the hugeness but I just got on with taking everything appart.
I then spent several hours unpicking my overlocking. I must be progressing a bit sewing-wise though because this is the first time I have had the patience to do this. Normally I just chop overlocked clothing and hope. And usually wreck it!

Well this time I did everything properly and carefully stitch ripped and deconstructed completely. So then I am left with the outside velvet layer with pockets attached, the inside lining layer, the waistband and my circle of elastic. I now decided to go with my own ideas and put the waistband on to see how big it is. My conclusion was the fabric is very stretchy being a four-way lycra stretch so I chopped around 4 inches off the waistband and then remade it. This time though I did not bother to redo the gathering on the side where I had rejoined the waistband into a circle so my finished garment has only one side of the waistband gathered.  This does not matter since now the waistband fits better and forms natural gathers - although the side I did not cut still has the gathers made as directed by the Burda magazine directions. Anyway having put them back together they are still very large but not so voluminous I cannot wear them. They are also perfect for lounging at a weekend although not really any good for sport since they are too big for that. All in all I will wear them but it will be round the house I think or to go to the supermarket rather than for sport or work. If I was to make them again it would be in cotton jersey or sweatshirt fabric in which case I wouldn't bother to line them although the velvet is lovely and warm and it is very cold right now in the UK. Actually that is another thing I feel I am progressing with - lining. I have never before lined a pair of trousers.


These are easy to line being so loose fitting but even then its a step closer to making "proper" well made clothing and that is ultimately what I want to aim for.

My only regret is I do not think these trousers do my fabric justice and I cannot help but wonder how long it will be before I rip them appart and make something else out of them. Still I made them, I will wear them and enjoy them for this winter at least. They do look like the Burda picture too. I just expected them to be useful for sport-wear and really I would not recommend them for sport at all. I think they will be too warm for yoga and far too loose for any more active sports.
Thanks for reading
Bracken


Saturday, 20 February 2016

20: Blank Slate patterns High Low top

I have decided I need tops. I have made several dresses and leggings but only 1 top and in my wardrobe I have a serious shortage of nice easy to wear tops. I downloaded this pattern a while ago but only stuck it together a few days ago. I decided to follow my new rules and make it up first in a muslin especially since I followed Mel's advice and did the adjustment to the shoulders recommended for my body type. Assuming it does fit I would wear it.

The directions for all of this is in Mel's tutorial.

This free pattern is from Melly Sews of Blank Slate Patterns:
http://mellysews.com/2013/02/high-low-shirt-tutorial-pattern.html
Its only available in a small which I reckon is around a 36 EU size. The pattern is for wovens but Mel does say you can make it in a knit as well. I had knit fabric.

Anyway, I cut it out and sewed the darts no problem.


But due to not having any overlocking thread in white or cream ( my fabric is cream) and only having black, purple and red. I did not even have 4 white normal threads I could use and I did not think it would be a good pattern for contrast since the fabric is transparent in poarts so the coloured thread would show through on seams and not just hems which probably would look ok. I decided to attempt to sew this on a normal sewing machine.

BIG MISTAKE! 

Now I remember why I bought the overlocker!

And seriously big respect to everyone who regularly sews knits on a normal sewing machine. I am rubbish at it. I started sewing the shoulder up using a small zigzag stitch. First the sewing machine ate my fabric.

I had to take the machine appart to get the fabric out. You can probably see the chewed corner above.
Well I suppose I had to learn how at some point but today was not meant to be the time. The top was salvageable especially since I did not yet know if it would even fit and I started again only to have the machine eat my fabric again. I soldiered on. Inserted the sleeves OK and then did the side seams. I try it on and yes it does fit. I do not like it. I will definitely use the pattern again but may stick with using it for wovens because I work in my real life in an engineering research laboratory and generally I prefer this kind of top because its easy to wear and easy to move in so it will make me some very nice tops I think so thank you to Mel at mellysews.com for this freebie. I am very glad to have made the muslin but won't be wearing this one.


Also from now on I am only using an overlocker on knits. I can now cope with twin needle stitched hems but not zigzagging the seams on knits. I did used to do this but I just could not get a good enough finish. Still on the plus side I have made my muslin as intended and it fits so I am ready to go with lots of tops.

So how do you cope with knits?
 Do you use an overlocker/serger? 
Or do you use a normal sewing machine?

Thanks for reading and see you again soon 
Update on this rather boring fabric. Three years after I wrote this I discovered it tie dyes amazingly well  so then I turned the rest of this fabric into this really lovely and very favourite Tshirt.  
 
You really would not believe it was the same stuff would you?
Just proves no fabric buying is a disaster. You must just find out how to make it work!
Bracken

Thursday, 18 February 2016

19: Green leather look leggings


112-122015-b_large   


I like the look of this outfit in the January Burda style magazine:

I originally intended to make the jacket from brocade and the trousers in red coated cotton for Christmas /New Year. Anyway if you read any of my posts around that time you will already know I was ill so did not do any sewing. I planned quite a few projects but have just about caught up only now with where I was hoping to be by New Year. Possibly I was just being a bit too ambitious! Either way I need to get round to making something for spring now. I am thinking spring is green, Maybe aim for a kind of city version of a Robin Hood look?

Well last summer I bought several different colours in a stretch coated cotton fabric that looks like faux leather. I saw the Burda patterns and thought I could use some of this for the trousers. When I came to have a closer look at the fabric though I realise that the green at least is very very stretchy despite being woven. I mean more stretchy than most cotton lycra wovens are, so I reckon I can get a similar look from just making the trousers up using a  normal leggings pattern. The stretch gauge on the top of the envelope says my fabric is far more stretchy than this pattern needs so I went ahead and cut the trousers/leggings out. Well why sew a zip if you do not need to? I mean zips cost money and I am not the best sewist around so simpler is probably better for me. Maybe I will sew the zip version later when I have made a few more successful garments because I have had a few distasters recently.
Assuming this works I intend to make a few more pairs in different colours too. I am using the same leggings pattern as I did for the 10: Tartan leggings. The alteration is simply to cut a waistband because I found the pattern to be somewhat low waisted and I did not want that. The waistband is simply cut from the jeggings view of the same pattern. I cut it in a larger size but found I didn't need to so next time will cut the same size as my leggings pattern. Also I am intending to lower the front at the waist on my next pair since I like higher back waist but do not really want a high front waist. Basically this pattern does not fit my body so I intend to adapt it. Will have to trace it of course and make a muslin but then at least it should fit better.

Again I cut view C of Mcalls M6173. I did like the very long legs on that view so I am sticking with them for these trousers as well. Then I just serged everything and sewed hems with a twin needle.

I know they are leggings but for some reason I think of wovens as trousers. Or should I be calling them Jeggings? Jeggings never existed when I was a kid. When I first wore leggings I was 14-15 in the 70s and they were called Long Johns. Then we had leggings the next time around which was probably early 80s and into the 90s. I am not sure when Jeggings first happened. Anyway back to this sewing...............

And here they are: 


I am quite pleased with this project. I have this fabric in 3 other colours as well so I think probably I shall make at least 3 more pairs of these and maybe also a jacket.

 Somehow I think leather leggings should be tighter than I have made these. So maybe the next pair should be a smaller size. On the other hand having them slightly bigger means they are less likely to get "knees" in them or rip. Also although these are stretch ( in fact very stretchy) they are still woven so not quite the same as a spandex fabric.

What do you think?
All comments welcome.
Thanks for reading to the end of the post. 
Bracken

Saturday, 13 February 2016

Dog Coat

A while ago now I mentioned I had made two dog coats whilst making my 6: Warm black top with piping, Well I never managed to get a very good photo of them because when out walking the dogs just do not stop moving long enough or because it kept raining. Today I finally managed it so here is Reggie in his raincoat:


The coat has waterproof reflective outer with a cotton drill lining. It has leg straps made of 1 inch elastic which mean the coat stays on the dog even in high winds. I have always found that a problem with most shop bought dog coats. They also used to twist when the dogs started to run. This type doesn't twist. The leg straps make sure it stays put. My dogs are old now but they had similar coats when they were young and I found them the best style available even when the were very active. Not as pretty as a bomber jacket admitedly or a pink fuffy jumper but my dogs are a bit too big for most of the glamourous dog coats you can buy and always ended up with expensive rubbish till I found this design. It also comes right down to where his tail starts ensuring he stays properly cosy and warm. Reggie was not too happy being a model though due to it being quite warm today hence his normally very waggy tail did not want to wag till I took the coat off him but he was a very co-operative model.
Thanks for reading,
Bracken

Thursday, 11 February 2016

Great Minds.......


Just a day after posting about my red dress I was so inspired to realise Bardot tops are again in fashion so I am even happier to have made my red dress work in this way. I want to make a different type now. Maybe one like this from H&M:

 
It looks quite easy and from when last I bought one I am pretty sure it was just 4 tubes. One for the body, one for the neck and two smaller for the sleeves. Then you just have to add some shaping to join the sleeves to the body. I am going to have to make this now. I always loved this look. So everyone though, thats why it keeps coming back in so often.

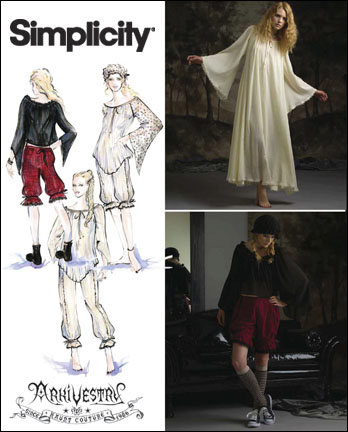
Of course there is always also the gypsy look. I currently own this pattern and have owned it for 5 years or so. Time to make it up I think:


I do love the Arkivestry patterns and own a couple of them. I might have to make the bloomers as well just for the fun of it. Now I am inspired although I do have a couple of other projects I need to finish as well. Spring is looking fun.

So what do you think about off the shoulder tops? Would you prefer the more fitted top above or the looser gypsy style top?

Thanks for visiting and see you again soon
Bracken

Wednesday, 10 February 2016

13: Red dress re-visited

I decided it was time to get round to trying to sort out the mess I made of my red dress. You can read about it here: 13: Red dress or long top

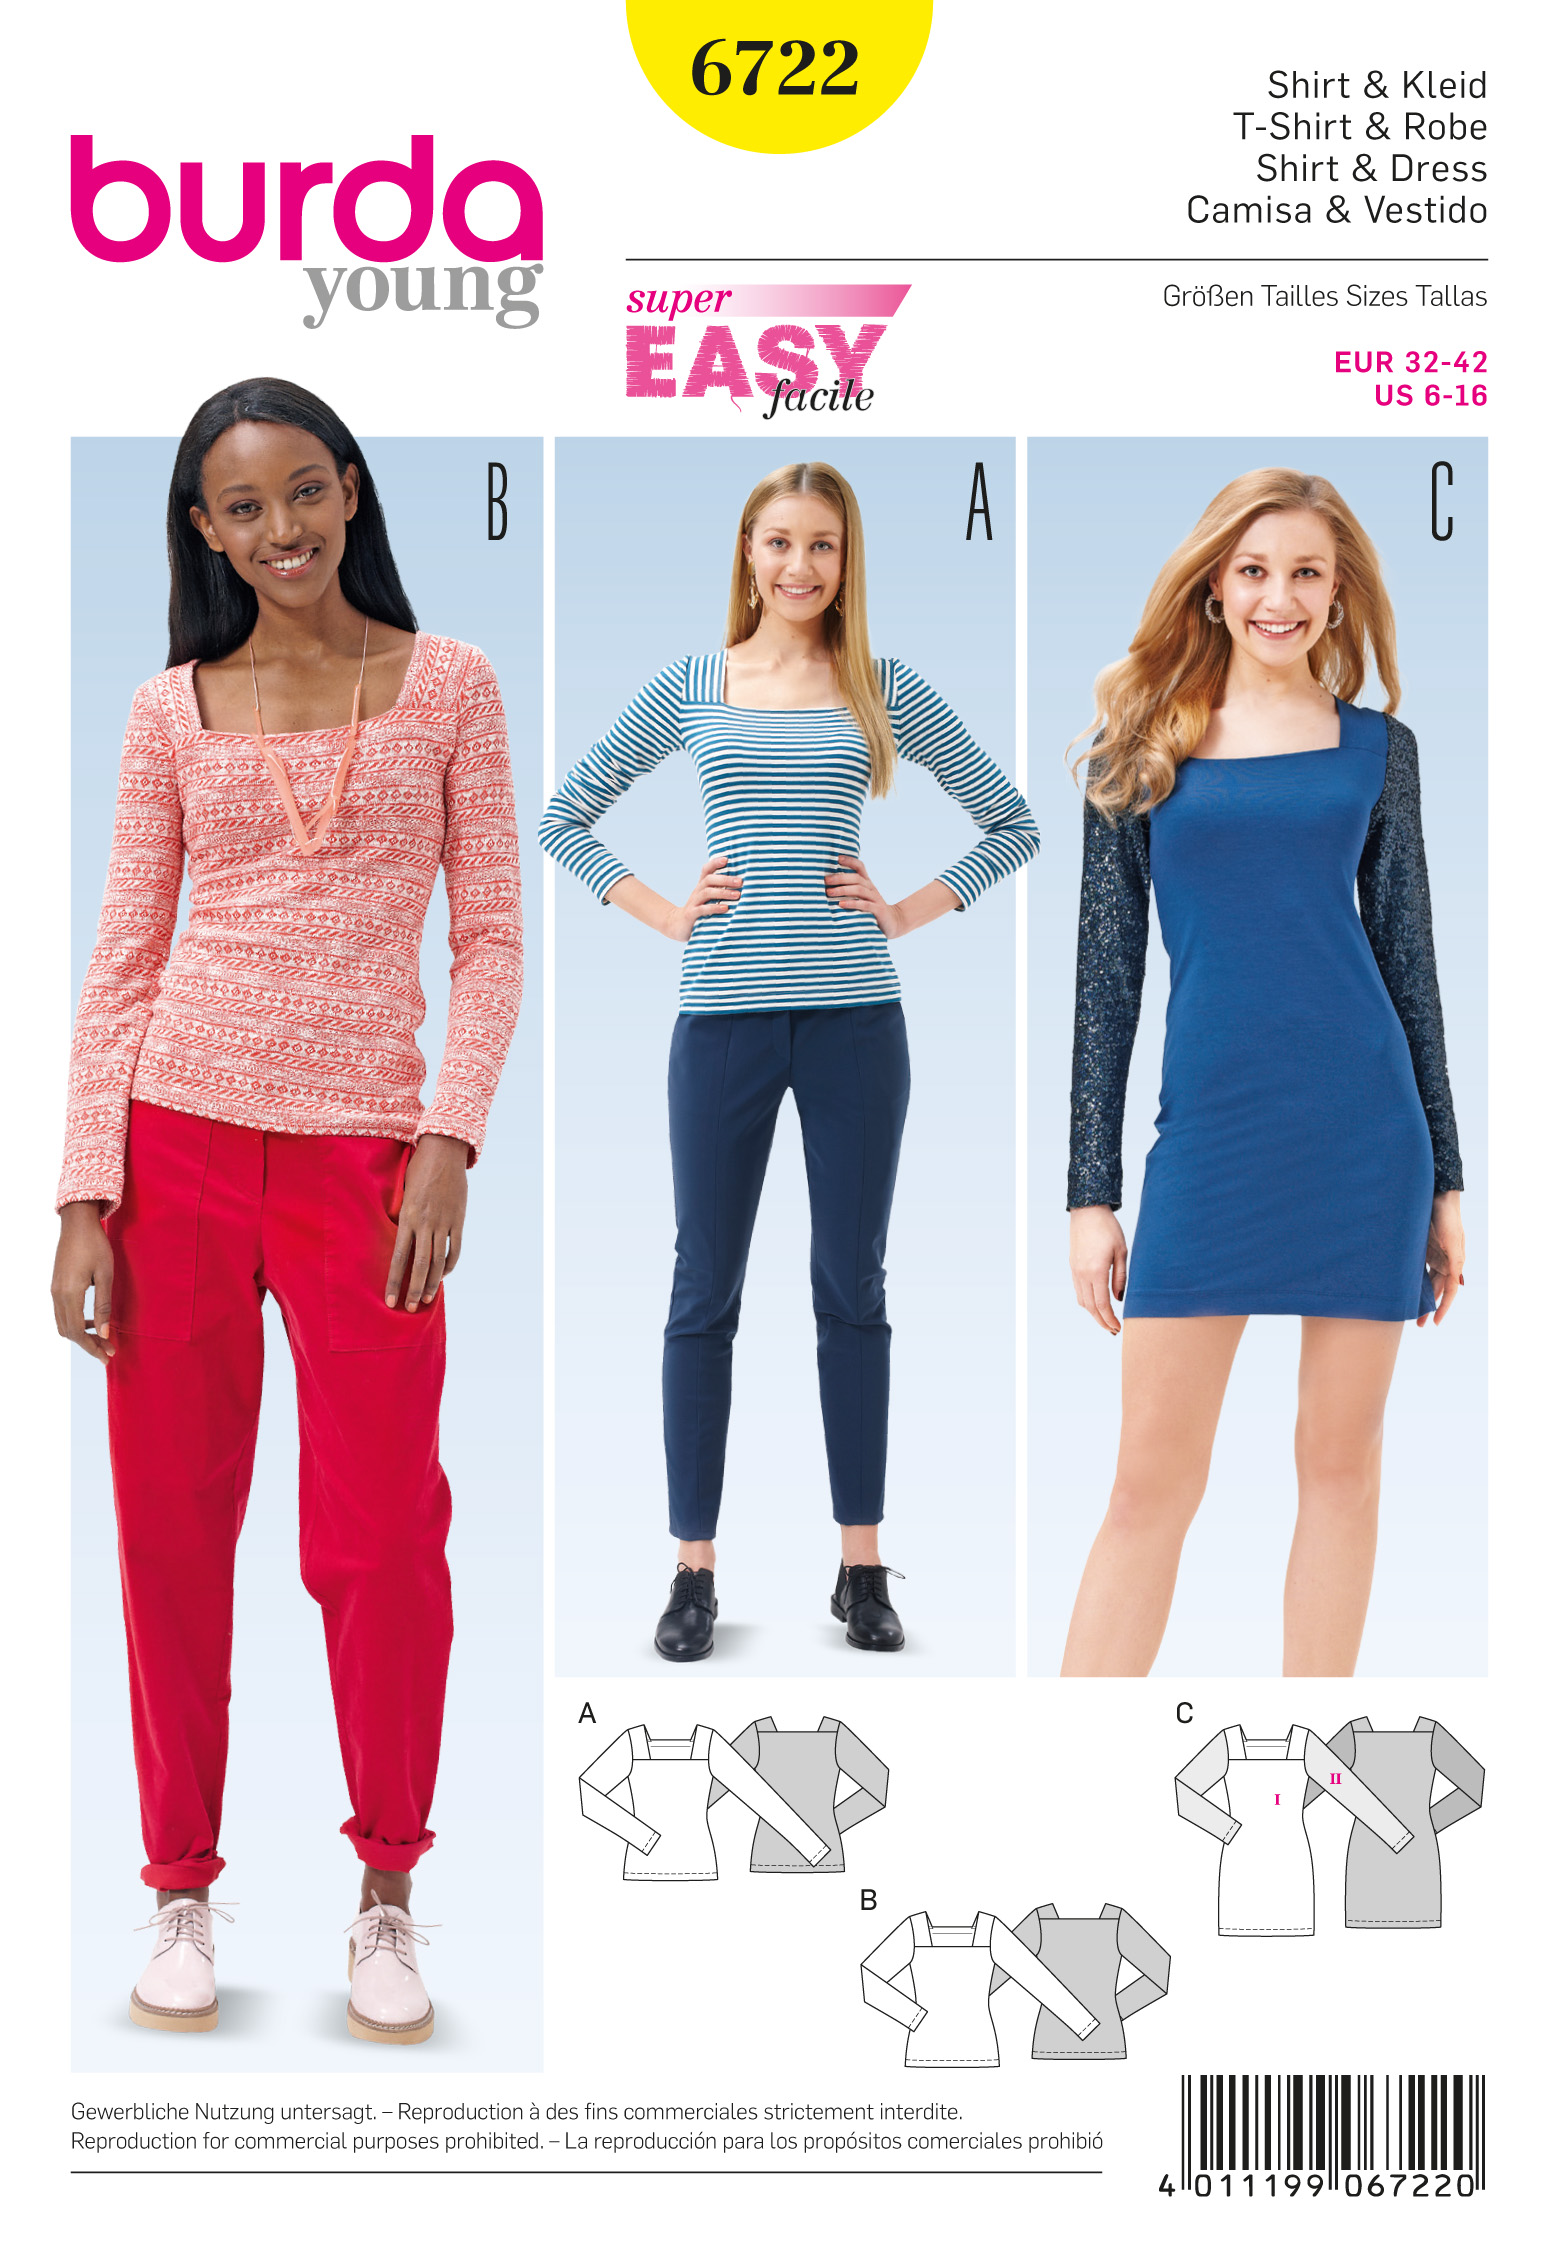
Anyway I made a complete mess of this pattern and almost trashed my fabric. I really like the fabric so do not want to end up just chucking it. I did try re-attaching the pattern pieces and recutting but there was not really enough fabric and when I came to sew it up it just was not going to work. I needed a different approach.
I started off with this pattern:
Burda Misses' Dress and Tops 6722


If you read the previous post on this you will know I completely deconstructed the dress by the end of my endeavour. So how to re-construct so it might just work?

If something doesn't work it is not automatically ruined. You just need to find a way to re-make it. Its a bit like up-cycling. You need to find a way to make the product yours and make it fit you. 

Long ago now I had a much loved top. It was kind of like a Bardot top but did not have the classic fold over neckline. It struck me whilst playing around with my disaster that this dress could be altered to fit in a similar way.

No, it will not make me a nice warm winter dress/top. But, it will make a nice vampirish dark-red off-the-shoulder dress so that is what I am going with.

To do it I first I threw away the shoulder parts and laid the top flat on a table and pinned where it seemed correct to do so but did not cut anything.

Then I sewed the sleeves in and sewed the side seams. I left the neck. Then repinned around the neckline.


Then I tried it on complete with prickly pins. I altered the position of a few pins and then used Harriet (my dressform) to try and make it fit better. One more try-on and I went for it and sewed the neck up. Well my reasoning was thus: its already ruined so I have nothing to lose and could just end up with a lovely red dress.

Then I cut off the excess seam allowance ( or what was left from the original pattern design after my hack!) from the top of the sleeves.

These are the photos. It was freezing so I am wearing running trousers under the dress but would not wear those to go on a night out :)

I had no one around to help me take them so used a not-very-good selfie stick that does not really work and I have to set a timer on the camera to take them and just kind of hope so they are not the best pictures but I will try and get a few good ones done the next few days and post them.


The error in all this is I did not finish the inside of the neck or sleeves but since its a knit I should get away with that ok. To finish I hemmed it using a twin needle.
The good things are I saved my fabric and did not just cut it into a new pattern such as a top which would have been an option even if it meant colour blocking with a different colour. I also still ended up with a wearable dress and in fact I think I actually like it better as a design than I would have done if the first attempt had worked.

And so I have a lovely red dress just in time for valentines day. And I do like it!
Thanks for reading
Bracken

Sunday, 7 February 2016

18: Wonderful people and easy knitting bat wing sleeved jumper or sweater

I have been on a bit of a yarn buying spree this last few weeks. First I bought the yarn featured in the bat wing sleeved project below. First though before I tell you about that I need to tell about this wonderful woman. Or two wonderful women actually. I bought some lovely mohair type yarn from ebay from this lady:
http://stores.ebay.co.uk/benlyndalle/

I bought 30 balls of yarn in total for a reasonably good price. 10 balls of a gorgeous purple and 20 balls of mixed colours. The lady who sells this made me up a special mix of colours since I did not want some of her mixes and she seemed nice even before I bought off her. Anyway the sale was done and I pretty much forgot about it for a week due to life as usual. Then I realised it had been a while and when I checked the estimated arrival day on ebay it had already passed a couple of days earlier. No wool had arrived so I contacted her. She was surprised it had not come and sent me a photo of the proof of postage. At this point I got concerned. I left it a few more days and nothing came. Then I rang the enquires number for the Royal Mail. They said to try going to the delivery office and see if any parcels were unclaimed. Normally if you are not in they leave a card but I reasoned that maybe it had somehow gone missing or been lost. The delivery office did not have it despite my seller having sent it in a pink bag with white polka dots so would be a pretty distinctive parcel.

Two days later she refunded me. This was the friday and it had been three weeks since I ordered the yarn. On Saturday I was decorating our stairs and landing with my partner. It was a nightmare project. Well still has yet to be finished. We stripped off this 1950s or 1960s paper which had been badly patched with different types of paper when the house was rewired probably in the 1980s and then painted. And then repainted. It was a mess. Infact had I thought about it I should have shown it here as a before and after project because it is unrecogniseable now from the mess we moved into. I may have to post a picture or two later once we have finished even though the overall project can not really be shown now. Its still not quite done but will be finished soon.

Back to my yarn. Here I am all covered in wallpaper paste and muck and there is a knock on the door and a lady is standing there holding my parcel of knitting yarn. Apparently it was delivered to her house which has the same address but a different postcode because it is in a different village!

Imagine my surprise! How useless is the local postman too to deliver my parcel to the wrong village. Well I was so happy because my seller had already informed me she had run out of the purple yarn I had wanted so much and was unsure if she can get any more of it. I thanked her and she went, after having asked me what I was intending to make from it. Then I emailed the seller to let her know and get an invoice to repay her. I was really quite surprised when she emailed back and said I could keep it as a "freebie" for being so honest. How lovely is that really? Makes you believe there are really some very nice people out there. The first lady returned my lost parcel, the second gave it me as a present. I am still overwelmed by this niceness. It restores my faith in humanity for want of a better expression. And this is what I got:


And as you can see my seller even attached a hand written note to me when she posted this long before any of this happened. What a lovely touch!

ANYWAY, after my half-way make of the  Lime fluffy stripey cardigan 
I decided this time to stop playing around and wasting good yarn and do a proper pattern rather than making it up as I go along which can work really well but recently has not made me any very good garments so:

The yarn detailed above had yet to arrive and I needed to start a new knitting project.
I decided I need to do a proper knitting pattern. In the proper gauge. I have had this particular pattern since 1983 or 1984 and never got round to knitting it. Anyway until starting it I never realised just how EASY this pattern really is because its all knitted in GARTER stitch. I am really not used to doing this at all. The last time I knitted in garter stitch was my very first jumper at age 16.So this is the pattern:


A close up of each page:


The black in this pattern is double knitting wool used double but I am doing it all in mohair type instead - my first deviation from the correct pattern but one I think will not matter since the gauge is still the same. Anyway a while ago now I bought this mohair yarn from the loveknitting site.
http://www.loveknitting.com/
When you buy off these people they send you the yarn in these lovely organza bags. I never thought too much about it at the start and just added it to my stash. Now I have decided to knit it up I am finding the organza bags brilliant for keeping the yarn clean and contained. The thing with knitting is you can do it "in between". So maybe carry it to work and do it during your lunch time, or take it to a friends house or on a bus or train etc. I tend to knit at night, while the TV is on, with one or both dogs trying to be as close as possible. This is obviously not a good thing at all for any yarn let alone a fluffy one which tends to pick up things like dog hair. I think even when I have finished with knitting this I am going to continue using these organza bags to keep currently-knitting yarns clean because they work fantastically for this. Also if the door bell goes or the phone rings and I need to move it stops it getting tangled around dog legs that keep moving all the time it seems.
I picked these colours:


And here is my knitting so far:


The pattern is shaped as you can see as you go along and is pretty easy to do so far at least. My only worry is there is too little shade differentiation, as in light and dark rather than hue between my cyclamen, blue, purple and green and then I have this really light blue in there. Still it may look fine when finished and is a particularly light weight mohair type of fuffy yarn which is going to make a lovely spring/summer jumper. That is assuming I get it finished this year but I am hoping by my posting on here it is more likely I will keep knitting and finish this. Or finish reasonably soon anyway. 
The lightness in weight and the transparency is yet another reaosn why I decided against doing this mixed with a normal DK yarn. The 1980s mohair was, I am positive, much thicker but knitted on the same needles because I still have one survivor from this period and it is even after around 30 years of wear thicker than this stuff I am knitting with now. I am knitting on the correct needles for the yarn and for the pattern but still it seems a bit lightweight to the mohair I used in the 1980s. But I will continue. 
The only change I might make is to do the same pattern front and back because I am not too sure about the different sides but will decide about that later depending on yarn quantities available for the second side etc. I may simply have to do it as the pattern due to not having enough of a colour otherwise.


And finally here it is kept nice and clean in my lovely organza bag:


Thank you for reading and hope to see you back here again soon,
Bracken