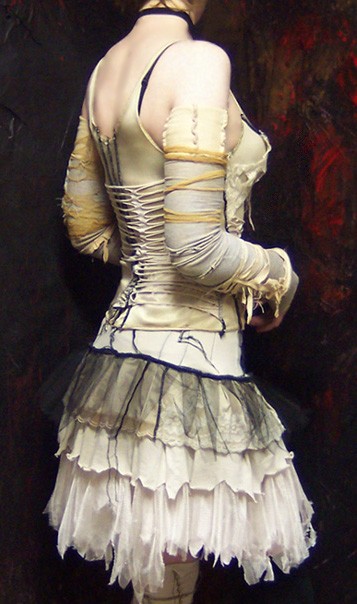
I found this dress in a thrift/charity shop in Rugby, UK. It was pretty dirty but only cost me £5 so was a bargain. I washed it regardless of it saying dry clean only and it came out perfect. The original dress is really lovely but not something I could ever have the occasion to wear and I bought it to chop it up and re-fashion into a fairy dress to wear for next years festivals.
Please excuse the half finished floor! You get the idea with
this dress. Looks like either a Bridesmaid dress or a ball gown. I am
not too sure which but for £5.00 it is I think a bargain. Perfect for a
play with anyway!
However Halloween is looming
so I decided to start the remodelling into a fairy dress now rather
than later. After all it can always do for next years festivals anyway.
I actually started this one morning before rushing out to work so it has taken me a while and quite a lot of thought to decide how to do this.
First of all I hacked the bottom off around 6 inches below
the waistline. The waistline is lower one side than the other and
decorated with a fabric flower that matches the dress material. I added small bits of fabric cut from the hem of the original dress to the flower to give it "tendrils" - see flower close-up lower down.
Excuse my messy living room please. I really must tidy up before taking photos!
My
original intention was to wear this now short dress over leggings. I
gave it a zigzag raggetty hem. My inspiration is from these dresses saved to "Sewing Inspiration" on
my Pinterest page:
I am not too sure what I will do as yet. I may wash the dress again to make the edges fray a bit. Though that may then mean it just falls apart so probably I should wear it first a few times and see how I feel about it.
Anyway, having hacked my dress I then decided it would be better longer.
Also the back seems a bit shorter than the front when worn as you can
see above.
At this point I decided I had made a terrible mistake so I added the
chiffon layer back onto the dress. I am now aiming for something more
like this dress from Pinterest originally found on Etsy:

At this point I attempted to do some designs.
As you can see I am not
really very good at fashion drawings! You get the idea tho! I reckon I
eventually need to make a sort of over-shirt or under-shirt. Similar to a
dirndl blouse to wear with this dress since although it is lovely with a
corset top it will be far easier to carry off during the daytime with a
top under or over the corset. Also the UK is often pretty cold and I do
actually want to wear this at some point possibly for Halloween which
is often very rainy and cold.
So then I set about making the skirt longer.

The original dress had three layers of fabric. A chiffon layer, a satin
under skirt and a lining so I decided to re-attach them but make them
different lengths. First I attached the chiffon on its own just to see
if it would look ok. Instead of just re-attaching I changed where it is joined because it has a longer bodice on one side than the other the original dress has a shaped lop-sided skirt. If re-attached with the short bit at centre front the seams will not quite meet but I do not care because by the time I have added other layers and chopped it zigzag fashion you will hopefully not see the miss-matched side and front seams so I now have a high low hemine. It seems a bit more fairy tale like this.

I also cut a new layer from some navy blue mesh. It is the kind of mesh
you can use for lining jackets and I have loads of it in my fabric stash
so it was time to play with some of it. I am thinking I can make a
hoody maybe with a pixie shaped hood similar to the one in the last Pinterest inspiration
picture above. Also when worn over a T-shirt as in my picture of the shorter version above it gave the dress an added very wearable dimension the bustier top would not give. And will be far warmer on Halloween in England!
I have lots of the navy blue mesh so whatever top I do
eventually make will be made from that as well.
I cut two pieces of
mesh roughly the same size and shape as the original skirt bits and added a zigzag chopped hem to them. One piece is intentionally longer
than the other with a view that the long bit is for the back of the
skirt. I originally intended to join them into a proper skirt but then
decided maybe just to overlap the pieces and sew them to the bodice
because I am after a raggetty look for this dress after all.
The original skirt was lined satin. To add onto the length of my dress, I had to cut off the hem of the lining pieces in order to separate them, and this left me with some thin bits of fabric strips which I tied around the flower. They look like tendrils.
Close-up of flower with my added "tendrils" of raggetty fabric strips cut from the double layer of dress skirt hem. Probably I will need
to use a few stitches eventually to secure them in position but right
now I am still not too sure exactly what I am doing to this dress since
it seems to be evolving.
The satin
layer also got a zigzag hem. After cutting the hem off the two bits of
fabric became separate so I hacked about 6 inches off the satin layer
but decided to leave the lining in tact for now.
Because I have a few days left till Halloween I have yet to decide my final version of this dress.
I now have a chiffon layer with intact hem, which I have removed again from the dress, a mesh layer and a satin layer. I also still have an unchopped bottom layer made from lining fabric if I decide to use it.
After trying on the dress with the shorter hem above I am now deciding whether or now to add a permanent long skirt onto the underside of the chopped zigzag hem of the short dress or should I just make a separate petticoat which means I can keep my options open as to wearability and have a short dress as above but with a long underskirt to be worn as and when?
Thanks for visiting and come back soon when I will have another post on the final version of this dress..........
Bracken