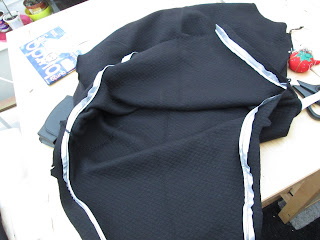
I was cold the last few days at work so decided I had to make a warm top to wear as soon as posible. I had this black quilted material in my stash again bought from Weston Fabrics on ebay. I am not too sure what the fibre content is but it has a small diamond quilting and is identical on both sides. Its quite a firm fabric and feels like it will be warm. Possibly a cotton/ polyester or cotton/acrylic mix? I already owned this pattern: Butterick B5679
Well if I had stuck to the original pattern it would have been even quicker since I decided to miss out the front and back centre seams. However I also decided to add piping around the raglan sleeves. See the last post about this.
In fact the hardest bit of this top was re-threading my overlocker with black thread. That actually took me nearly 3 hours to achieve! I still do not know where I was going wrong either so it is likely to remain threaded with black for some time I think.
Even with a few alterations it only took me an evening to cut out and about two hours to sew it up. That includes my struggle with inserting piping using an overlocker.
Well if you do try this it IS possible but I suspect better to first sew it in with a normal stretch stitch on a regular sewing machine rather than jump straight into overlocking. In the end that is what I did.
First I made the piping from waterproof reflective fabric which I had left over from making my two dog coats. That is what I actually bought this stuff for because it keeps them warm and dry being as it is waterprooof and also keeps us safe beacuse it reflects in car head lamps. It is similar to the ribbon tape on High-Vis Jackets. Anyway, where I live there are not many street lamps, and often the traffic drives fast through the village even though it is not meant to do so. That makes walking my boys very unsafe at night in winter. Since it tends to rain a lot in the UK as well and my boys are both 12 years old and feel the cold and have arthritus I made them these coats:
These are not the best photos but it is not easy getting them to stay still long enough for a good photo despite them being on leads. You can see better photos of my dog coats here: Dog Coat
I think since these are garments for dogs not people they probably should not really count towards my aim of 100 garments so I will simply add them in here as a project I made. To make them I just drew round some existing coats they had that are getting rather old and tatty now. These are a good design because the go lower down the back and around the tail keeping their sides, kidneys and rear end warm. Most dog coats seem to be shorter. They also have leg straps made from 1" wide elastic which stop them from moving around when they are wearing them. Most commercial dog coats do not have these leg straps and the coats constantly move and fall off sideways on the dogs. These are based on Bala dog coats which if you want to buy one I would recommend.
http://www.balafactoryshop.co.uk/pages/Dog%20coats%20index.htm
I will post a photo of my dog coats here in the next couple of days.
Since dogs tend to get arthritus in their back legs first I am hoping these will help. Also one of my dogs, Ron, hates going out in the rain so this will hopefully help. Both my dogs seem to like them.
Anyway back to my top.
I made the piping as detailed in a my previous post. Then I cut out my quilted black fabric. I changed the pattern slightly and put the centre front and centre back pieces on a fold because I didn't want a seam there.
I then sewed the sleeves on using my overlocker or serger. This was a big mistake! It is really difficult to keep the piping in the correct place whilst serging. Even though I had sewn the piping to one side using a regular sewing machine then serged the other side onto it I had great problems getting this to work. Some of the piping I actually serged over.
As it turned out where I serged over the piping on one side I ended up cutting the overlocked stitches and re-sewing using a regular sewing machine to fix it. You can just about see it in the above picture.
Some piping I didn't get close enough to so this I also sewed with my sewing machine to bodge it so ity looks ok.
The next picture shows where I got a wrinkly finish on some of it:


Finally the easy bit was adding the collar:
As it turned out it looks good and I am very happy with it because it is a lovely warm top. I have yet to find out if it will survive for long though after I had to fix it!
I have learned from this project though and if I make this again I will do it differently. But then I am learning to sew here and isn't that the reason why I am writing this blog and doing this project?
Thanks for reading
Bracken


No comments:
Post a Comment