


The fabric was just £1.25 a metre hence I bought it because when I had a look online its seems to usually be around £10 a metre for this quilted sweatshirt type of fabric, and this also is snake print well its quilted actually but this is snakeskin pattern whereas most are just diamonds quilts or other boring "prints".

I previously used this kind of fabrc for the warm black top I made at the start of my sewing journey.

I still have this top though keep thinking I should either add mitts or cuffs because the sleeves are too short for me. But I still wear this after all those years. Its not very well made at all but is warm and wearable and as you can see has a diamond quilting. I made it in 2015 so its old now.
This snakeskin fabric has a shiny side which I used for the inside and a matt more cotton looking side used for the outside. I do not have a clue what the fibre content is but suspect its polyester. Really you could make a feature of the matt/ shiny aspects in panels but I didn't. I went with matt on the outside.

Then the pattern. Well I now possess around 100 Burdas, Patrones. La Mia Boutique, My Image etc yet despite many days of perusing them could not locate the right pattern for what I want.
What to do? I ended up with a large pile of possible patterns but still at the end of over a week of looking cannot decide. Then by chance I am looking at my Rebecca Page downloads and remember Stella. Stella is a coat pattern I bought ages ago but have never got round to making.

I do not want a coat tho but the basic shape I am thinking of is similar. Sort of high low. I do want pockets but not the type on Stella and I definitely do not want a lining because I want a Cardi-coat.

I print Stella and stick together still unsure what I am going to do or even if I will use it but then its a pattern I do want to make at some point so not a complete waste to stick it together anyway.
After another week or so of thinking, I come to the conclusion I want the double front on Stella. Having analysed the construction of lots of waterfall front tops and jackets my conclusion is when left open and made in drapey fabric the Stella front will act like a waterfall front. So I want the CF panel but not the pockets!
I decide on easy inset pockets and I want a hood. Stella has no collar or hood. The hood from my favourite Burda sweatshirt pattern 103, 01/2017, if lengthened at centre front neck should fit onto the neck of Stella so thats one thing solved. But how to do the front and back?
Well the back is easy because I want exactly what Stella is a Low back grading higher at the front. I miss out the back half belt. I was in two minds whetehr to eliminate the CB seam but then I would have to go off grain to keep the godet type hem which I want so decide to stick with Stella ad cut two CB pieces and seam them.
I realised the lining
parts of Stella side front will work and that will elininate the pockets
so I can basically swap the Stella lining pieces for the Stella outers
and get what I want to make - I think. But then the fabric was only £5.
Not that I want to waste it because it will cost a lot more to replace
my 4m of this and probably I cannot get a snakeskin print either but its
still a reasonable financial risk for what I am attempting. And now its
complete I am so glad I carried on with this idea. I was seriously
worried whether to risk cutting this for such an experimental idea.
So I cut the back pieces and the front pieces and side front lining pieces - adding a couple of inches to the hems where normally a lining is a bit shorter because I do not want to waste all day working out the differences I need to add and I reckon around 3 inches or 7.5cm will work. Later I cut most of this off though so it was probably an unecessary waste of the fabric really.
Cut the CF - again also adding a few inches length.


So now I have all my coat parts - nearly.
I want mitts on this because its
a kind of sweatshirt and I love them. I have Raynauds and mitts make my
life much more comfortable. I used the mitts pattern from the Make Your
Own Activewear book by Melissa Feyre. This is so far the best mitts
pattern I have found and I have tried a few. 
I have started to add this
to all my tops recently. Its tricky to sew but lovely to wear. I
have since found a much better and neater and easier way to sew these
mitts, - see the post on 1st May 22 for details on that. I made this earlier though before I worked that out. They still work but are not so neat.
Then having got to this stage I could not sew it up because my overlocker blades were still in transit from China. Once I had the overlocker back in action I sewed this up in a weekend. Good thing I had sharp new blades. I suspect in fact I maye even need new ones much sooner than usual. This fabric is thick and very hard to sew especially where the mitts join the sleeves ( and there are 6 layers!) and I had to use a regular machine to reinforce that after it got stuck the second time. If I make another of these in this kind of fabric I would sew the overlocked edge to the sleeve and mitts seperately then use a machine to sew together. Normally I overlock it all - which I did but it was a struggle and I was worried I might wreck this after my second block-up. Very risky and far too thick fabric and by that time I was looking at this thinking I was going to love it so did not want to wreck it right at the end!
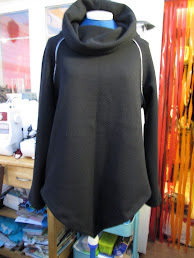
Here you can see how my waterfall front really does work:

With the front done up it has a kind of Assassins Creed feel too. Or a post apocalypic feel.

Though I am going to have to sew that second press stud to the other side of the neck!

The neck is imperfect because I was going to sew a hem along front edges but I think they will hang better without so the ends got turned under at high neck and then I changed my mind. I do not mind this small imperfection. The closure is a simple press stud on one side of the neck because I hate hand sewing but I definitely need to add another.

Otherwise, I will be constantly adjusting it when the front comes undone. Thats OK on a sunny day like today but will be awful in the rain and wind which will be bound to come soon - being the UK. Ignore the black bag at the side. Its not full of rubbish but full of logs for the woodburner. We need to build a new log store but things take time and we do not want to kiln dried wood (which we paid extra to get kiln dried) getting too damp. Its not ideal but the best we have right now.

I was originally going to add hems but I like the flowingness of the simple overlocked edges so that idea got scrapped. I think they hang better without hems as you can see on my old top which is similar fabric too. It does not hang well because its too bulky.
.
And the back is just so gothically wow! I love the back best of all:

I am very pleased with how this has turned out because the planning took weeks, the cutting was extended because I was so scared it would all go wrong. The hoody neck was the hardest bit to work out in this design when I was sewing it up - as in how to actualy join the front neck to hood neck at CF. I actually stopped and left it overnight and just thought how to do that bit best. The actual sewing though was really fast and on top of all this it fits perfectly with this years theme of a Faery fashion look as well as working with my winter goth look that seems to return each year.
Though perhaps by then it might be retired because I think this fabric being sweatshirty will pill and probably this is a coat for a season or two, then I will need a new one. Still I now have a pattern and design that works and these blog post notes to remind me how I did it. So useful blogs for recording as well as connecting with like minded people. The worst bit was really having to hand sew the press stud on one side of the neck. Though tomorrow I will have to sew a second one now I know I need that. Still not the end of the world really to get exactly what you were dreaming of for just about £5 ish including the sewing thread and press studs that I already owned.
What a total success!

Its rare I truly feel this happy with what I make but yes this time I do.
I am also wearing me made tiger leggings and a red vest top that I made thats so long ago I do not think it ever made my blog.
Happy Me Made May and thanks for popping over,
Bracken
What a great hack. Thanks for all the details
ReplyDeleteHi Karey, Thanks. Though it seems I may now need another set of overlocker blades before much longer. The thick fabric definitely blunted them a bit. Still I suppose havig to replace the blades is something I need to learn to live with.
DeleteWhat a fabulous coat! I am glad all your changes worked! I hear you can get these little shavers that remove pilling these days!
ReplyDeleteHi Laura, Thats a good idea to get one of those shavers, because I expect this will go pilly and I want it to last as long as possible. I never thought about them before. Thanks.
Delete